# ML Ops - Deployment
Note
To make it easier to flick back and forth, it's often useful to click the link to this doc and open in a new tab.
# Overview
When creating enterprise-ready machine learning applications (ML Apps), challenges rarely stem from the business problem or the machine learning itself. More often than not, the hard part is ensuring that the business logic and ML sit in a framework with rigorous controls, that meets both strict uptime and performance SLAs.
This guide will take you through:
- Initial Setup
- Creating An App
- Deploying the App and the associated ML model
- Setting up the Git Repository + Continuous Integration/Deployment
- Other tools for maintenance (e.g testing, versioning, hardware configurations)
The app used in this guide is derived from a Kortical-provided web app template. It is designed to be that easy jump off point that has all of the complex stuff solved:
- An easy to adapt HTML based UI
- Python based ML model usage
- Easily extensible API
- Failover, redundancy, audit trail, easy scalability and other important production enterprise features
- Continuous Integration & Deployment / Automated testing (CI/CD)
- An open stack based on Python, UWSGI, NGINX, docker and Kubernetes
PRE-REQUISITIES
This tutorial assumes that you are using:
- Github for source control and that you have installed the GitHub CLI (opens new window).
- Kortical SDK. Refer to the Kortical SDK documentation setup page, which details a range of installation methods depending on your operating system and preferences.
# Creating An App and Project
# 1. Create a codebase for your app.
Go to your git folder in your CLI, or wherever you want to create Kortical apps. Create the app, selecting the web app template:
> kortical app create <app-name>
Available app templates:

	[1] web_app_template
	[2] bigquery_app_template
	[3] excel_app_template
	[4] automation_template

Please select a template index:
> 1

Retrieving template web_app_template to current working directory. Path to template project will be /Users/owen-saldanha/git/test_apps/<app-name>
Created [web_app_template] template for [hell] at /Users/owen-saldanha/git/test_apps/hell
This will create a folder with the specified app name; by default, this will be in your current directory.
# 2. Create a virtual environment for the app.
Although you may have already created a venv for running the Kortical package, the requirements for your app may clash with your currently installed libraries. It is strongly recommended to create a new venv for each app folder that is created, so running code locally is quick and easy.
Method 1: CLI (recommended)
Create a python 3.9 venv and install the requirements:
> cd <app-name>
> <path-to-python3.9>/python3.9 -m venv app-venv
> source app-venv/bin/activate
> pip install -r requirements.txt
> pip install -e .
> cd <app-name>
> <path-to-python3.9>/python3.9 -m venv app-venv
> copy "app-venv\Scripts\python.exe" "app-venv\Scripts\python3.exe"
> app-venv\Scripts\activate.bat
> pip install -r requirements.txt
> pip install -e .
// Make sure to add code blocks to your code group
This will create a venv called app-venv, to create a venv with a different name change the last parameter.
Method 2: PyCharm
Alternatively, open the app folder inside Pycharm (File → Open → <app-name>). If prompted to create a venv, select a base python 3.9 interpreter. For Dependencies, navigate to the project folder root, select the requirements.txt and accept.
Note
All further steps assume that we’re in the app directory and have it's venv activated. To activate a venv: source <path-to-venv>/bin/activate, to exit a venv: deactivate.
# 3. Create a Kortical project.
Introduction to projects + environments
A project is essentially a logical grouping for a deployment. It contains a number of environments that we will deploy to, on a journey from local development to production ready. Each environment will have deployed instances of the ML models, apps and services that make up our project.
To make development and reproducibility easy, Kortical gives you the ability to create challenger environments; these are full replicas of a given environment, in which you can alter what model/app versions are deployed. Once you are happy with changes to your challenger environment, you can commit to git; after the continuous integration has run successfully, the changes are automatically propagated to the main environment.
In this example we are going to deploy a web app for document tagging, which is powered by a natural language processing (NLP) model.
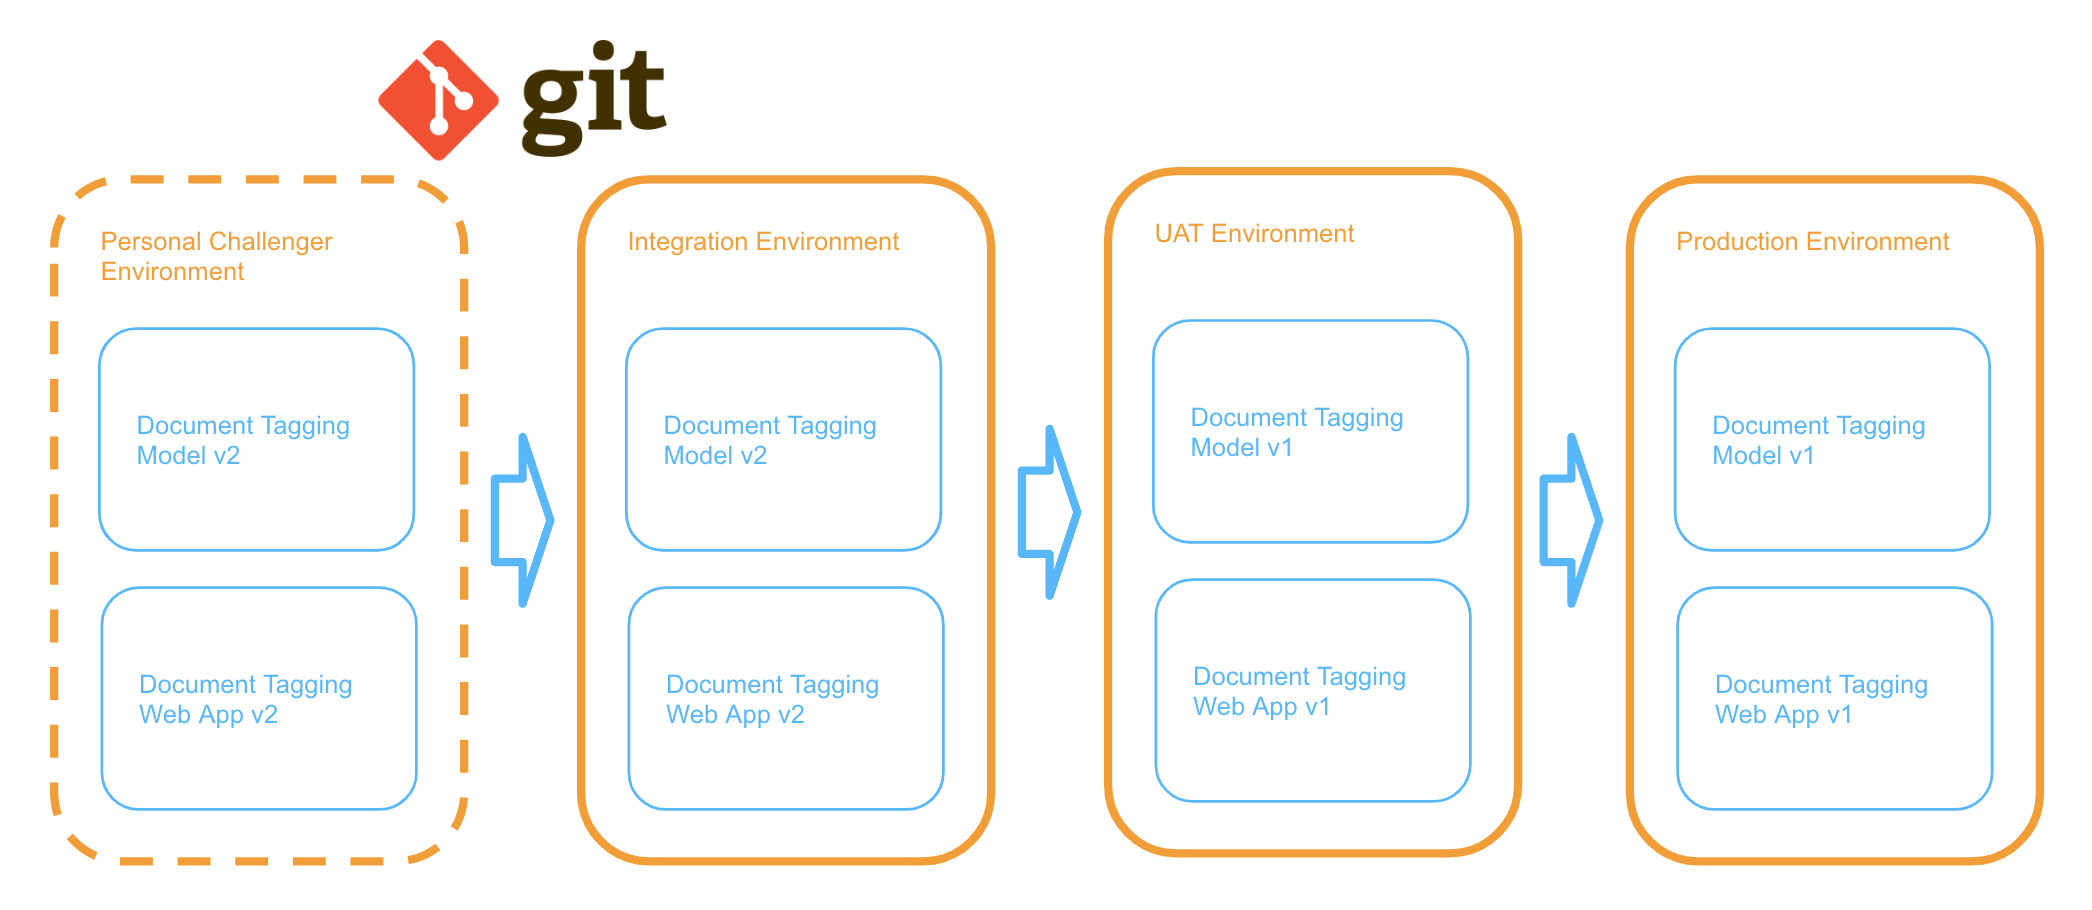
In the example above, version 1 of the app and model are already deployed to the other environments, we’ve developed a new model and new version of the app to go with it in the challenger environment. Once we’re ready, we can commit the code and it will deploy to Integration. Once we’re happy that everything looks good in Integration, we can promote both the app and the model atomically to the next environment. Once user testing has complete, we can again promote to Production, making for easy error-free deployment and rollback.
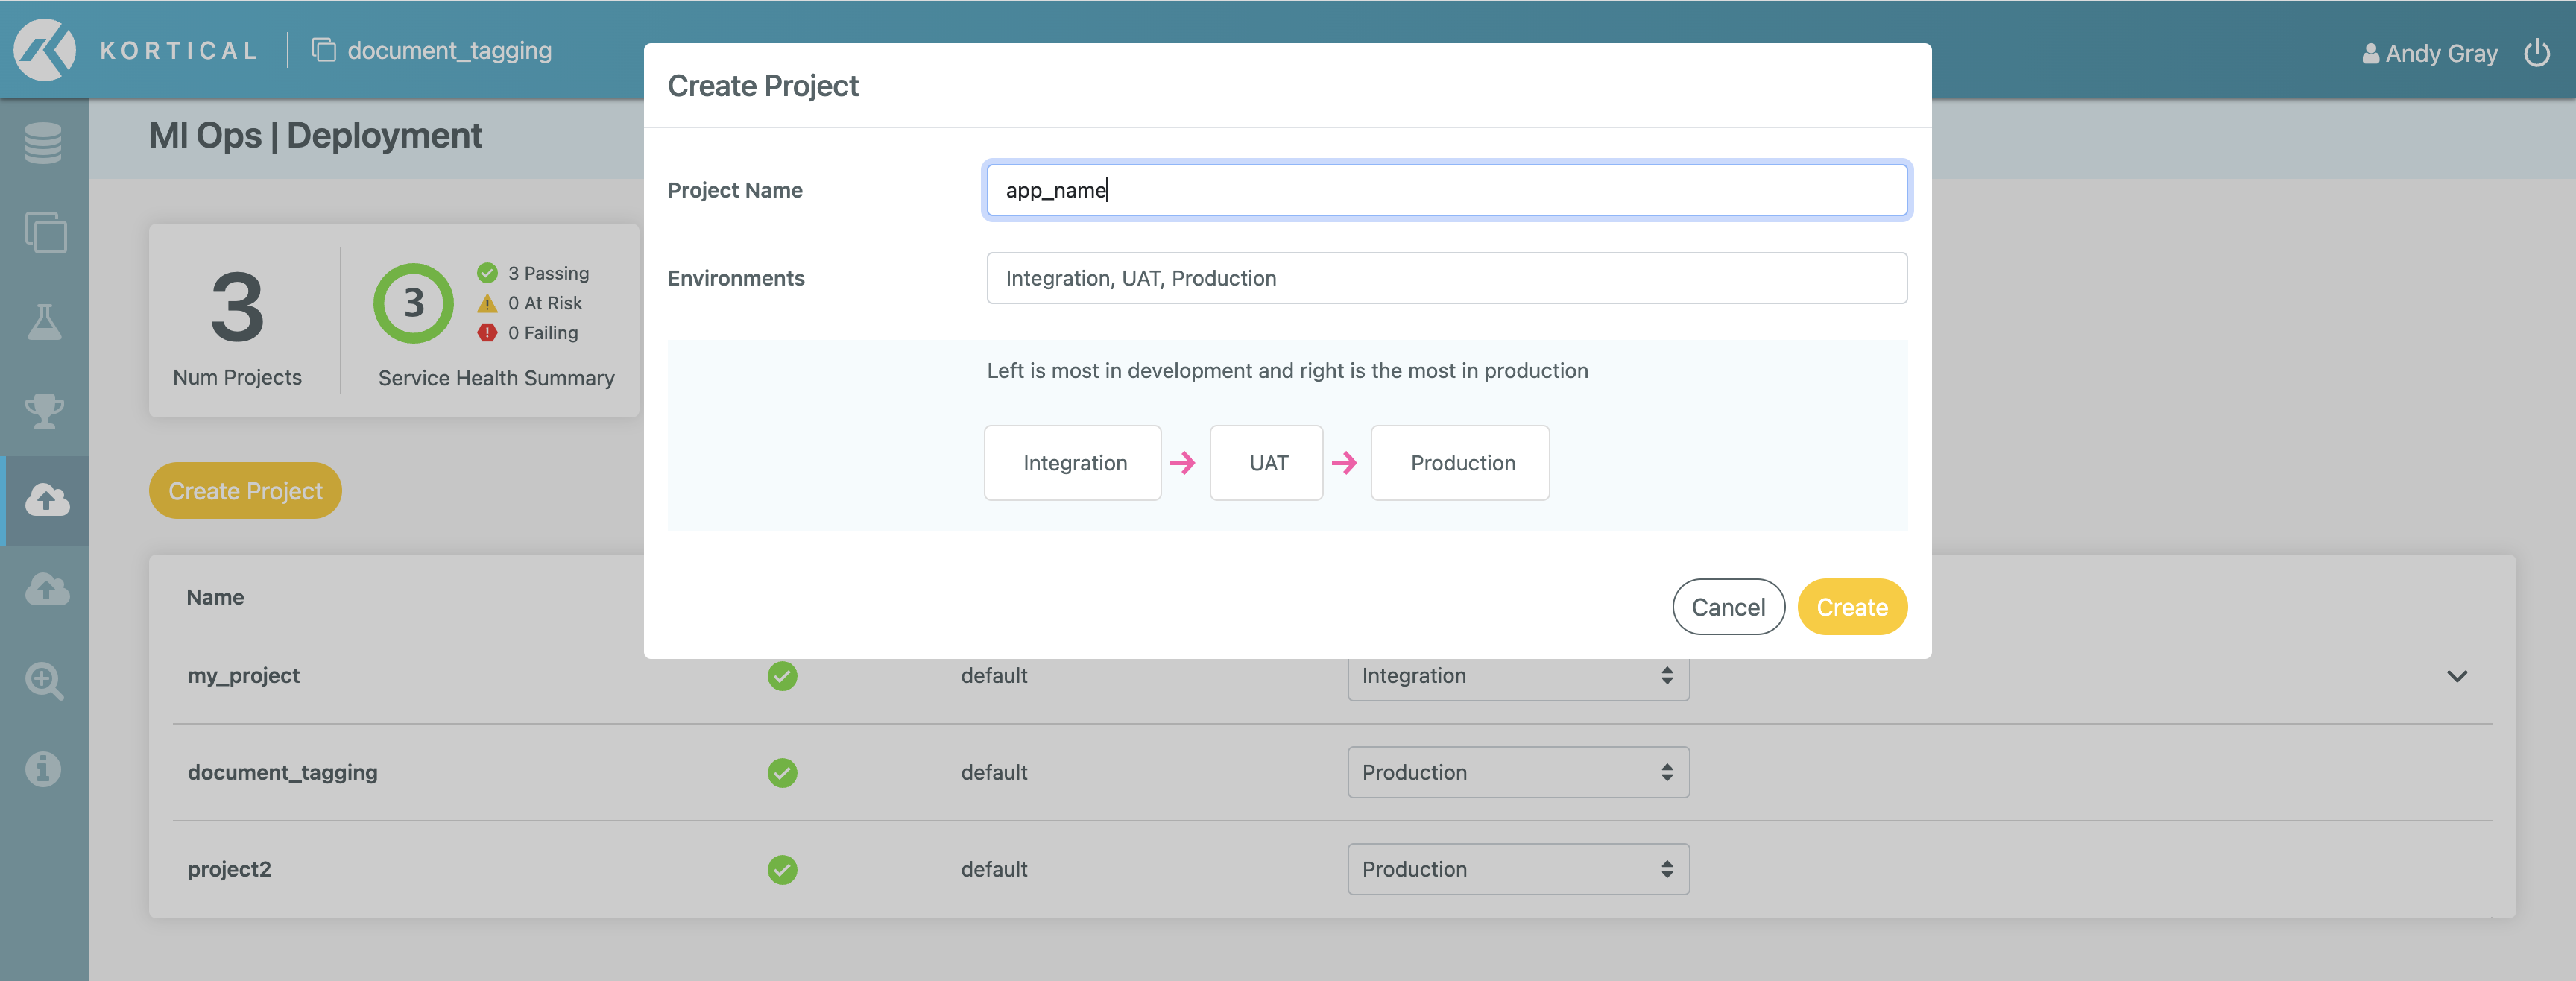
Navigate to the MLOps | Deployment screen in the platform and click Create Project, then enter the app name or another project name:
# 4. Select the project.
We’re going to initialise Kortical again. Doing this for each app imitates the git/github pattern so it is easy to switch between projects. As the state for selected system, project and environment are all held in here:
> kortical config init
Select the project (if unsure, run kortical project list to view all projects):
> kortical project select demo_app
Project [demo_app] selected.
+----+----------+----------------------------+
| id |   name   |          created           |
+====+==========+============================+
| 4  | demo_app | 2023-01-22 14:48:24.201360 |
+----+----------+----------------------------+
Environments in project [demo_app]:
+----+-------------+----------------------------+-------------------------+----------------------------+
| id |    name     |          created           |         project         | promotes_to_environment_id |
+====+=============+============================+=========================+============================+
| 64 | Integration | 2023-01-22 14:48:24.317583 | id [4], name [demo_app] | 63                         |
+----+-------------+----------------------------+-------------------------+----------------------------+
| 63 | UAT         | 2023-01-22 14:48:24.280797 | id [4], name [demo_app] | 62                         |
+----+-------------+----------------------------+-------------------------+----------------------------+
| 62 | Production  | 2023-01-22 14:48:24.237302 | id [4], name [demo_app] | None                       |
+----+-------------+----------------------------+-------------------------+----------------------------+
Environment [Integration] selected.
+----+-------------+----------------------------+-------------------------+----------------------------+
| id |    name     |          created           |         project         | promotes_to_environment_id |
+====+=============+============================+=========================+============================+
| 64 | Integration | 2023-01-22 14:48:24.317583 | id [4], name [demo_app] | 63                         |
+----+-------------+----------------------------+-------------------------+----------------------------+
As a result of doing kortical config init for this folder, this will not affect other repositories which have a different project selected. Selecting a project will also automatically select the first environment within that project.
# 5. Set environment config.
Introduction to environment + app config
Ideally, we will write code in development and not have to change it at all as we deploy to different environments. However, the app's behaviour needs to change depending on environment; for example, we might want more verbose logging in production but less in UAT, and save reports into a separate bucket for each environment. Creating a static config for each environment sounds like a great idea. The problem here is that there is often another type of config, like say we retrain a machine learning model and it has a new threshold. If you’re using the new version of the model, then you need to use the new version of the config, so as we promote the model version to the next environment, we need this config to be promoted with it.
As such we created two types of config:
- Environment config: This is always related to an environment and does not get promoted along with apps. Ideal for cases such as where to store artefacts, what channels should error reporting be sent to.
- App config: This config stays with the version of the model / code. If I deploy version 7, I get version 7’s config, if I deploy version 12, I get version 12’s config. This is probably where most config should be and is ideal for cases such as ML model thresholds, label classes to merge / drop, etc.
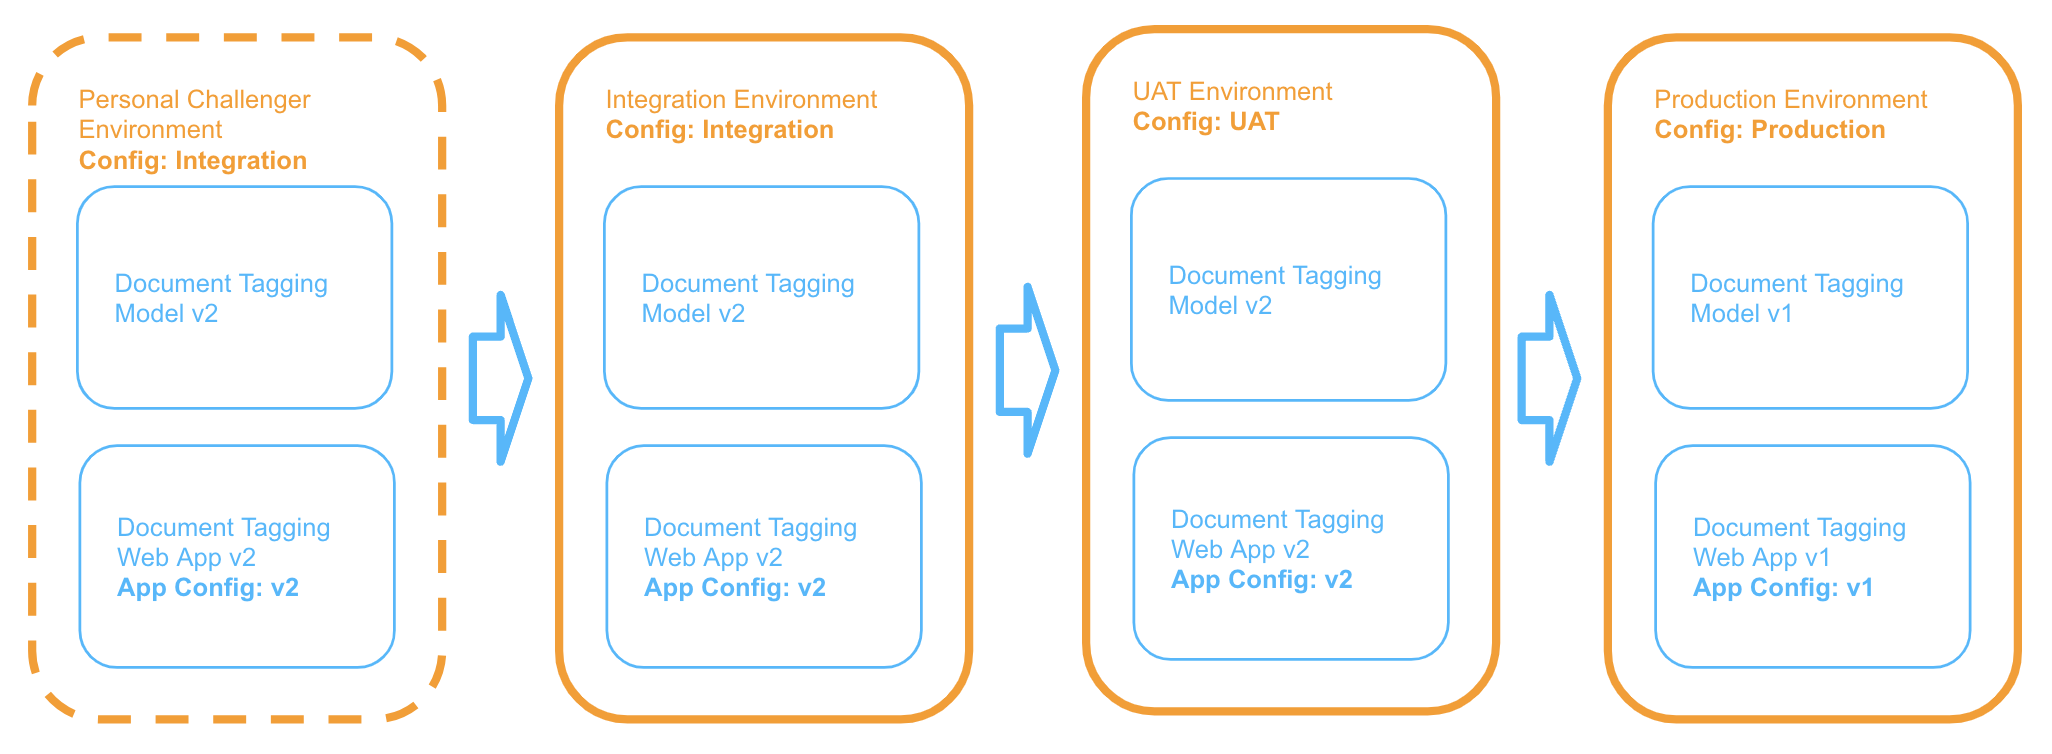
The above image shows that version 2 of our app has been deployed to UAT, so everywhere we have v2 app config, we have v2 of the app, similarly for version 1. Conversely, the environment config is unaffected by version promotion and stays associated with the environment.
Accessing the config within the app code is super simple:
from kortical import app
from kortical import environment

app_config = app.get_app_config(format='yaml')
param1 = app_config['param1']

environment_config = environment.get_environment_config(format='yaml')
param2 = environment_config['param2']
In the web app template, a config file has already been provided for each environment (e.g config/environment_integration.yml):
app_title_extension: '- (<environment_name>)'
colour1: 'slategray'
colour2: '#ff8800'
# bucket_path: bucket/reporting/<environment_name>/request_data
This example uses a .yml format, but you can use whatever you like (e.g json, plain text). We use these parameters in the app to override some cosmetic aspects in src/<app-name>/ui/index.py.
Run the script local/set_environment_configs.py which uses the SDK to set the configs for the selected project:
> python local/set_environment_configs.py
We’ll need to re-run this step any time we change these environment configs.
# 6. Create a challenger environment.
When we’re developing and making changes, we often need to interact with other components in the system but we don’t want to affect anyone else.
First let’s check that we still have the Integration environment selected:
> kortical status
System url [https://platform.kortical.com/<company>/<system>]
User credentials [<email>]
Project [demo_app] selected.
+----+----------+----------------------------+
| id |   name   |          created           |
+====+==========+============================+
| 5  | demo_app | 2023-01-22 16:39:04.555168 |
+----+----------+----------------------------+
Environment [Integration] selected.
+----+-------------+----------------------------+-------------------------+----------------------------+
| id |    name     |          created           |         project         | promotes_to_environment_id |
+====+=============+============================+=========================+============================+
| 68 | Integration | 2023-01-22 16:39:04.609802 | id [5], name [demo_app] | 67                         |
+----+-------------+----------------------------+-------------------------+----------------------------+
Components for environment [Integration] in project [demo_app]:
	No entries
Apps in current directory [<app-folder-path>]
<app-name>
Once we confirm that have the right project and environment selected, we can create a challenger to that environment. This will create a full replica of the environment, including the environment config:
> kortical environment challenger create <your-name>
Environment [<your-name>] selected.
+----+------+----------------------------+-------------------------+----------------------------+
| id | name |          created           |         project         | promotes_to_environment_id |
+====+======+============================+=========================+============================+
| 65 | andy | 2023-01-22 16:37:23.715730 | id [4], name [demo_app] | 64                         |
+----+------+----------------------------+-------------------------+----------------------------+
When we create a challenger environment it automatically selects it. You can confirm this by running kortical status again.
# Deploying the ML App and Model
This example consists of two components: the web app and the NLP model. By having the components separate, we can easily update the model without having to do a full app code release and vice versa.
Since the app relies on the model, we will deploy the model first.
# 1. Deploy the model.
Run the following:
> python local/create_model.py
(NB: This will take a few minutes. Since we have the challenger environment selected, this is the environment where the model is deployed.)
This script creates an NLP model using Kortical’s AutoML, based on 199 examples of news articles/categories from the BBC news website. Feel free to examine the code; it is a simple example of model creation, which doesn't require the pre/post-processing we would expect in a real ML application.
This is one of many ways to create high performance models with Kortical, alternatively you can also just use your own custom models. More details on model creation are available in the Kortical Platform and Kortical SDK documentation sections.
Once the model has been created, we can test it works as expected and passes our model validation test:
pytest tests/test_api.py -k "test_model_accuracy"
If you see the error Error model [document_tagging] not found. Has the model been trained and has it had enough time to start?, wait a minute and try again.
# 2. Deploy the app.
First, let's set an api_key to protect access to our app. This is the API key that users will need to pass in to access the app’s endpoints (https://platform.kortical.com/<company>/<system>/api/v1/projects/demo_app/environments/<environment-name>/apps/<app-name>/<endpoint>?api_key=<api_key>). This should be something that's hard to guess. One way to create it is to go to https://www.guidgenerator.com/online-guid-generator.aspx (opens new window), click Generate some GUIDS!, then click Copy to Clipboardand finally paste it into the config/app_config.yml .
data_file_name: "bbc_small.csv"
api_key: ce17bb77-fbb7-41da-8978-19f085f367a1
model_name: "document_tagging"
target: "category"
logo_image_url: 'static/images/k-logo.svg'
app_title: 'ML Document Tagging'
Deploying the app at this point is very straightforward:
> kortical app deploy
Note
On MacOS/Linux, you may need to start a SSH agent; to do this, run eval $(ssh-agent).
This will take a while to build the first time, however the Dockerfile is structured such that subsequent deployments for code changes should be very fast.
This might be a good time to dive into a little bit about how the code base is structured:
├── README.md
├── config # These are our various configs decribed above
│   ├── app_config.yml
│   ├── environment_integration.yml
│   ├── environment_production.yml
│   └── environment_uat.yml
├── data # This is the dataset we use to create the model
│   └── bbc_small.csv
├── docker # You shouldn't need to edit this much  but this is where the docker config is
│   └── app2
│       └── Dockerfile
├── k8s # 1 per app, add more to create more apps in this repo. You shouldn't need to edit this much but this is where the k8s config is
│   └── app2.yml
├── local # These are the scripts that we run locally and don't run in the app
│   ├── create_model.py
│   ├── run_server.py
│   └── set_environment_configs.py
├── pytest.ini
├── requirements.txt
├── setup.py
├── src
│   ├── app2
│   │   ├── api # This is where we define the API endpoints that are available for this application
│   │   │   ├── endpoints.py
│   │   ├── authentication # This demo apps use a relatively simple token based security, if you require OAuth, ask us for that template
│   │   ├── main.py # Entry point for the app
│   │   └── ui
│   │       ├── index.py # Defines the endpoint for the index HTML and templates in the various parameters
│   │       ├── jinja.py
│   │       ├── static # The static folder where non templated web files are served from
│   │       │   ├── images
│   │       │   │   └── k-logo.svg
│   │       │   └── js # We've created the simple app as a set of web components but you can use what you like
│   │       │       ├── Article.js
│   │       │       ├── Events.js
│   │       │       ├── Header.js
│   │       │       └── Tags.js
│   │       └── templates # Where our jinja2 templates are stored
│   │           └── index.html
└── tests # The directory where all of the test code resides for unit, integration and smoke tests
    ├── conftest.py
    ├── helpers
    ├── test_api.py # unit tests that run the web server locally and don't need a system to run
    └── test_functionality.py # integration tests that require a deployed system
Once the deploy command has finished, we’ll see some output like:
Waiting for status [Running] on component instance: project [5], environment [69], component_instance_id [164]
Deployed Kortical Cloud app [<app-name>].
If it is a webservice it will be accessible at:

https://platform.kortical.com/<company>/<system>/api/v1/projects/demo_app/environments/<environment-name>/apps/<app-name>/

Deployment of [<app-name>] has been completed!
Copy the whole link (including the trailing slash) from your CLI and paste it into your browser to see the app in your challenger environment. Remember to attach the API key or you’ll see a 401 unauthorized request. If it says default backend, keep refreshing as it can take a minute or two to come online.
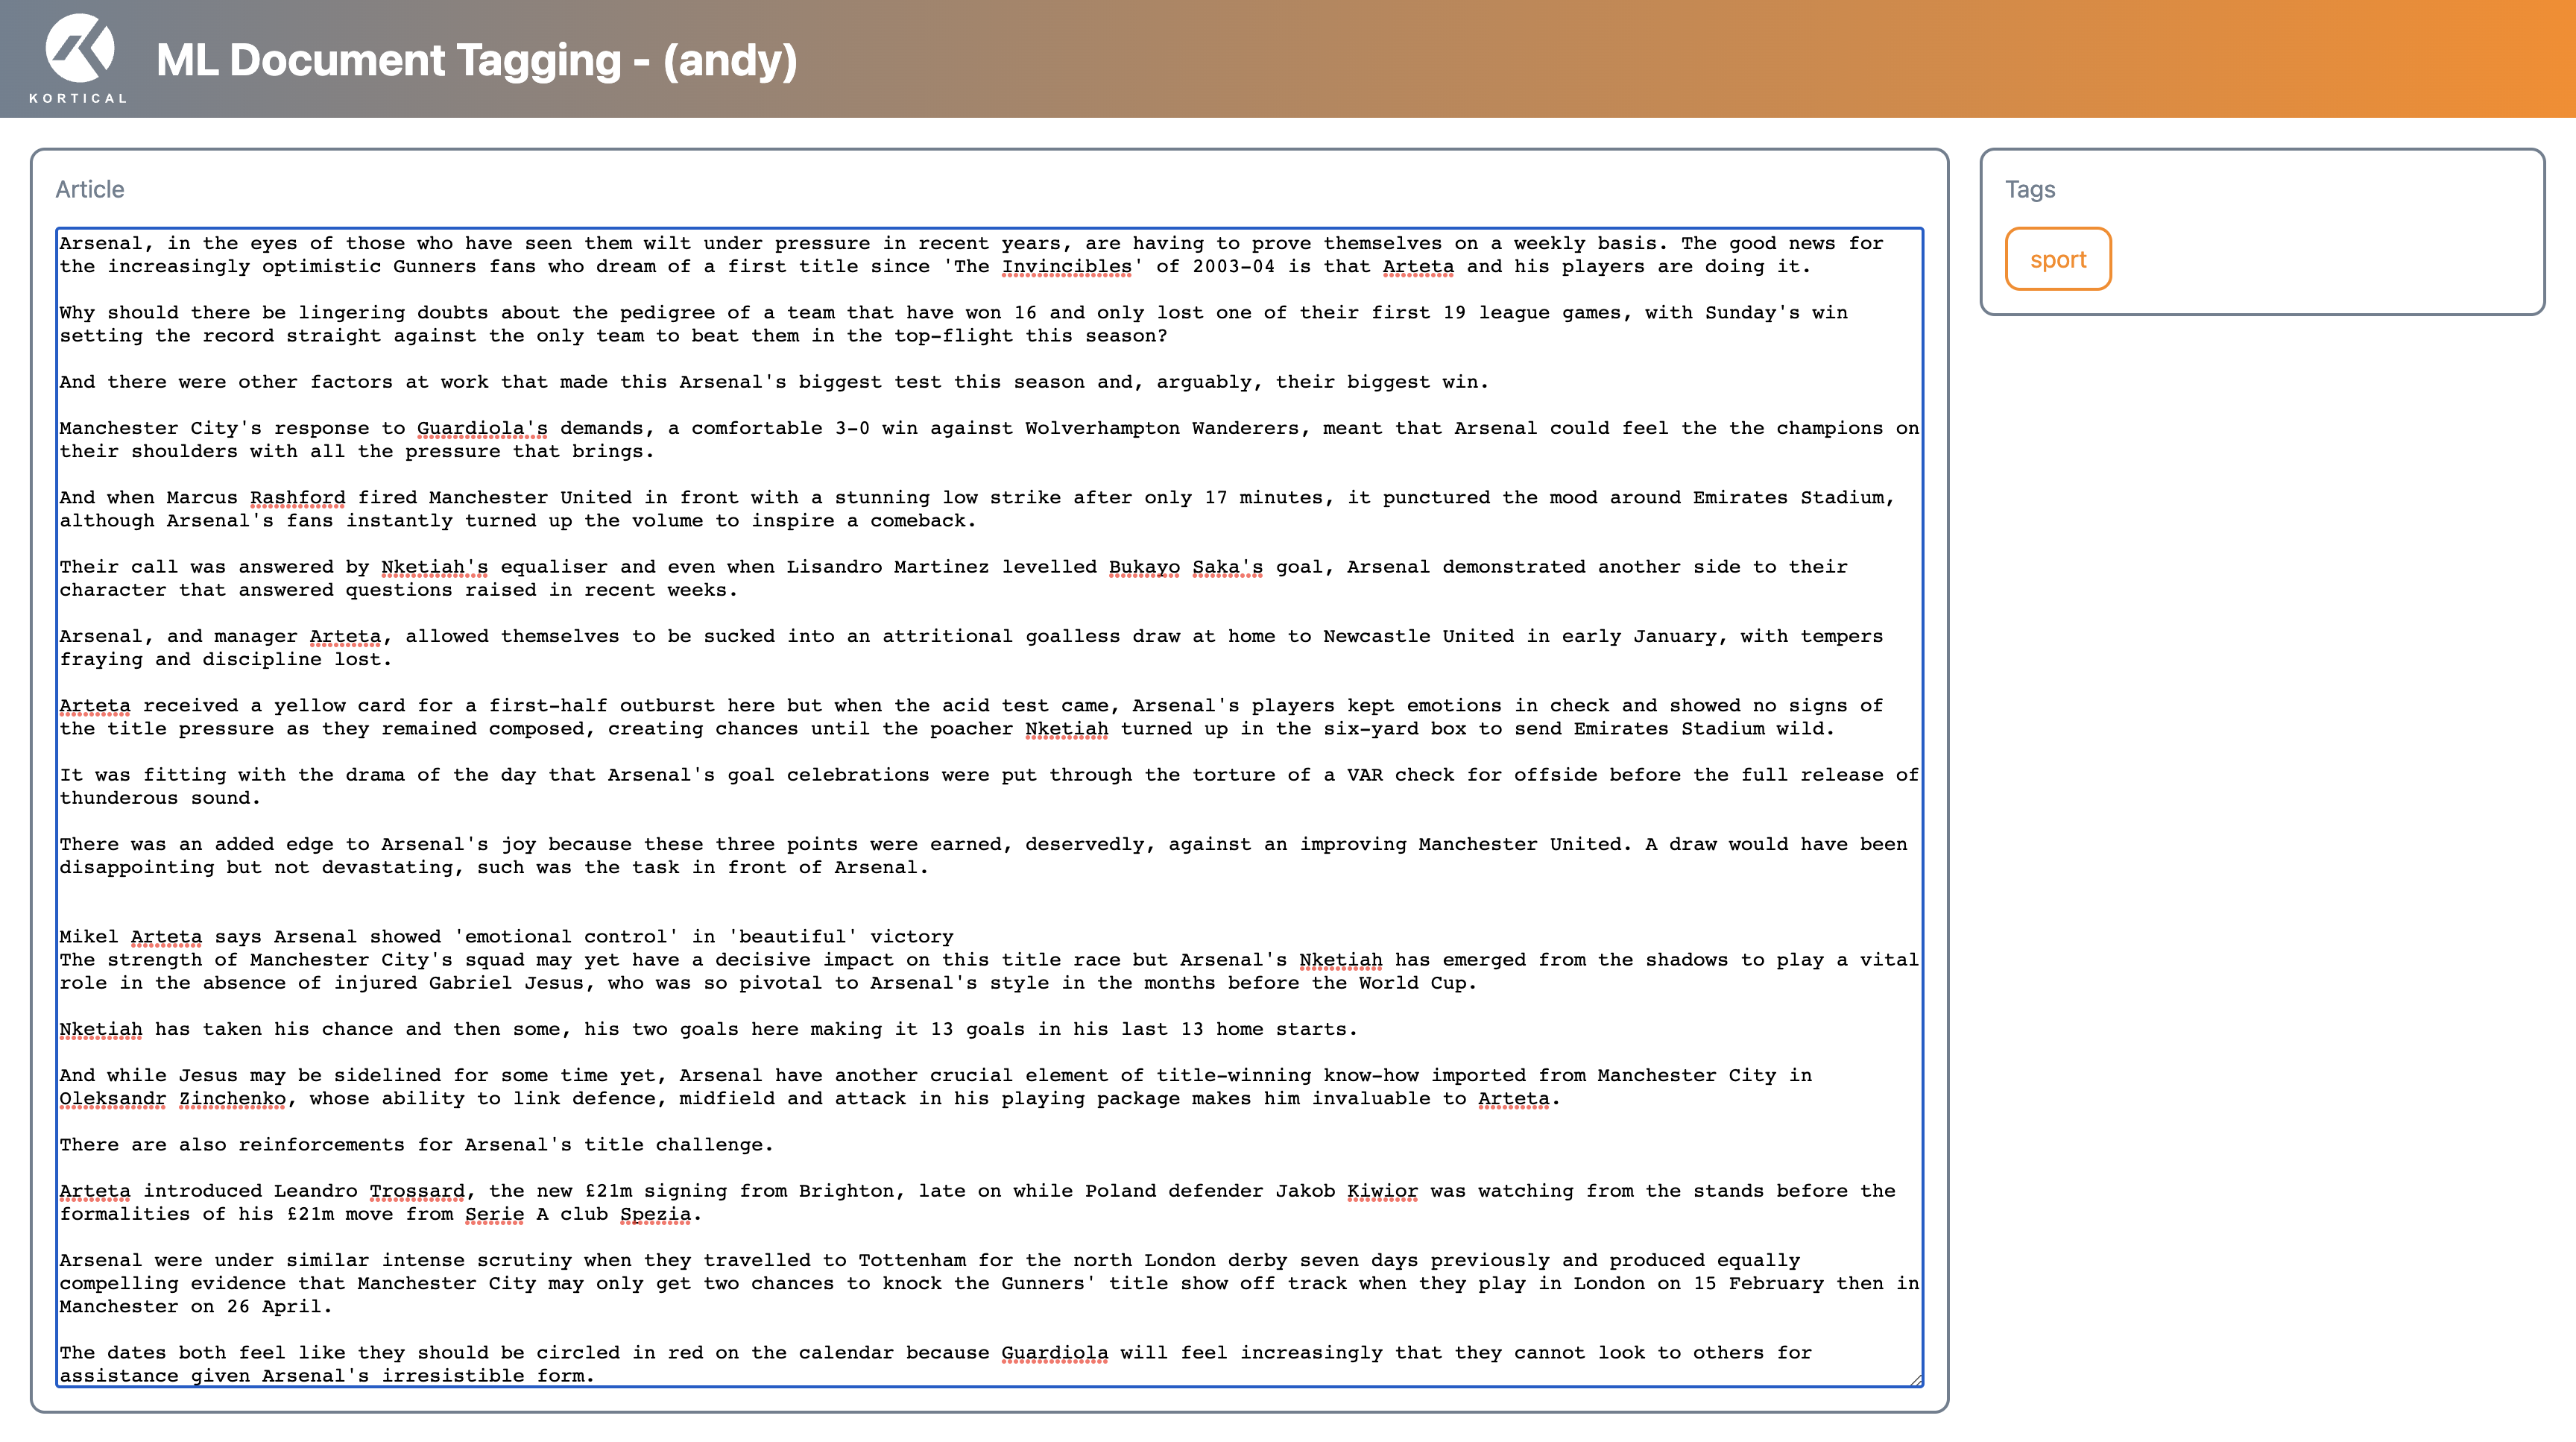
Do try out the app yourself! Go to BBC News (opens new window) (the website the model was trained on), copy a news article into the window and see if it gets the category right.
You can use kortical status to view component URLs at any time:
https://platform.kortical.com/<company>/<system>/api/v1/projects/demo_app/environments/<environment-name>/apps/<app-name>/?api_key=<api-key>
# 3. Run some tests.
On average, a developer creates 70 bugs per 1,000 lines of code and 15 / 1,000 get released to the customer (opens new window). While some bugs are inevitable in new features, there are robust ways to do a lot better than the average and have very few bugs occur in existing features.
The web app template includes various kinds of tests:
- Unit tests - These tests run the app code locally. They are fast-running tests that check pockets of functionality in isolation.
- Integration Tests - These run against a deployed app. They are full end-to-end tests that check the app works in an environment (i.e with other apps/models). These are used in the Github continuous integration to check that everything works before merging to master (see next section).
- Smoke Tests - These are quick-running integration tests. These are mainly used to check that everything works after promoting an environment with new app/model versions.
Let's run the unit and integration tests:
> pytest -m "unit"
> pytest -m "integration"
# Setting up the Github repository and CI/CD
Running tests locally can help mitigate many issues but for robust testing and to ensure that deployments are fully replicable, we need to:
- Build and run all of the apps and docker images independently from source code as part of the build process
- Test the apps in a full replica of the production environment with the correct versions of all of the other components it must interact with to test out all of the interactions
- Deploy from source with no user interaction, to remove user error / deployment of the wrong thing
- Automatic versioning as part of the commit / build process, meaning that the versions deployed reflect those committed to a specific version in source control
- Provide a mechanism for tested versions of deployed environments to be promoted atomically, with minimal avenues for error / minimal human intervention
- Further smoke testing to ensure that the minimal differences have not broken anything
The continuous integration / deployment (CI/CD) and Github actions we set up here provide all of these benefits to ensure we produce apps that have minimal issues in production and are perfectly reproducible. The versioning gives us identifiable state that the tracking of that state means we can track exactly what was running when and recreate that state easily should we need to. If we release a bad version or ML performance drops vs a previous version, rollback is simple.
Introduction to Component Config
Component config is a specification file that reflects the state of an environment (i.e what app/model versions are deployed to it). An example looks like this:
components:
- component:
    component_version_id: 79
    name: document_tagging
    type: model
- component:
    component_version_id: 31
    name: nlp_document_classifier
    type: app
The continuous integration commits a file config/component_config.yml as part of the CI/CD process. Pre-commit hooks check what versions you have running in your selected environment (assuming that the selected environment is the environment that you have been testing against) and offers to update the config if the versions differ. This provides a record in git of not only the code for the app but also of all of the other apps and models in the environment to replicate the full system functionality at deployment time. It also allows us to identify potential merge conflicts and to select the appropriate version when merging to master.
The CD will use the committed config/component_config.yml file when deploying to ensure the deployed environment reflects that committed to source control.
If you update just the other components in your selected environment and not the app code or config but want to commit those changes to kick off the CI/CD with the new versions, you can run the pre-commit hook directly to update the config/component_config.yml file, as so:
python .git_hooks/pre-commit
Then commit and push the change to git as usual to kick off the workflows.
# 1. Create the Github repository.
Initialize git in the app folder and create the repo with Github CLI (If you need to install it, you can find it here (opens new window)).
> git init
> gh repo create "<github-organization>/<app-name>" --private
Add the git hooks to the repo, so it can remind you to sync your components from your environment to your config before check-in.
> git config core.hookspath .git_hooks
After we create the repo (but before pushing our initial commit) we need to add our credentials to the repo to setup the continuous integration workflows. You can ask the Kortical team for a service account or you can use your own credentials.
> kortical config get

Config found at: ['/Users/owen-saldanha/.kortical', '/Users/owen-saldanha/test_apps/document_tagging/.kortical']

Kortical Config:
	system_url: https://platform.kortical.com/<your-company>/<your-system>
	credentials: gAAAAABjy5a0w3wBGnpZUXDdh2F4KG8GDI34eF_YDkBca123AcnVYzN_cbiuuGn8accyzxTcVMb8JWL9oKH-7cP8ER_LqKzW55Yx74IELWeDUH9iWilKbxiS9adV7PpP04rjhXyZTYy6sdfJjAICnP2TMTBqQ-Q==
	selected_environment_id: 6
	selected_project_id: 2
Copy the credentials line (just the part starting gAAA). With this string in hand we go to our github repo → Settings → Secrets and Variables → Actions → New Repository Secret. Then enter:
Name=KORTICAL_CREDENTIALS
Secret=<long-credentials-string-above>
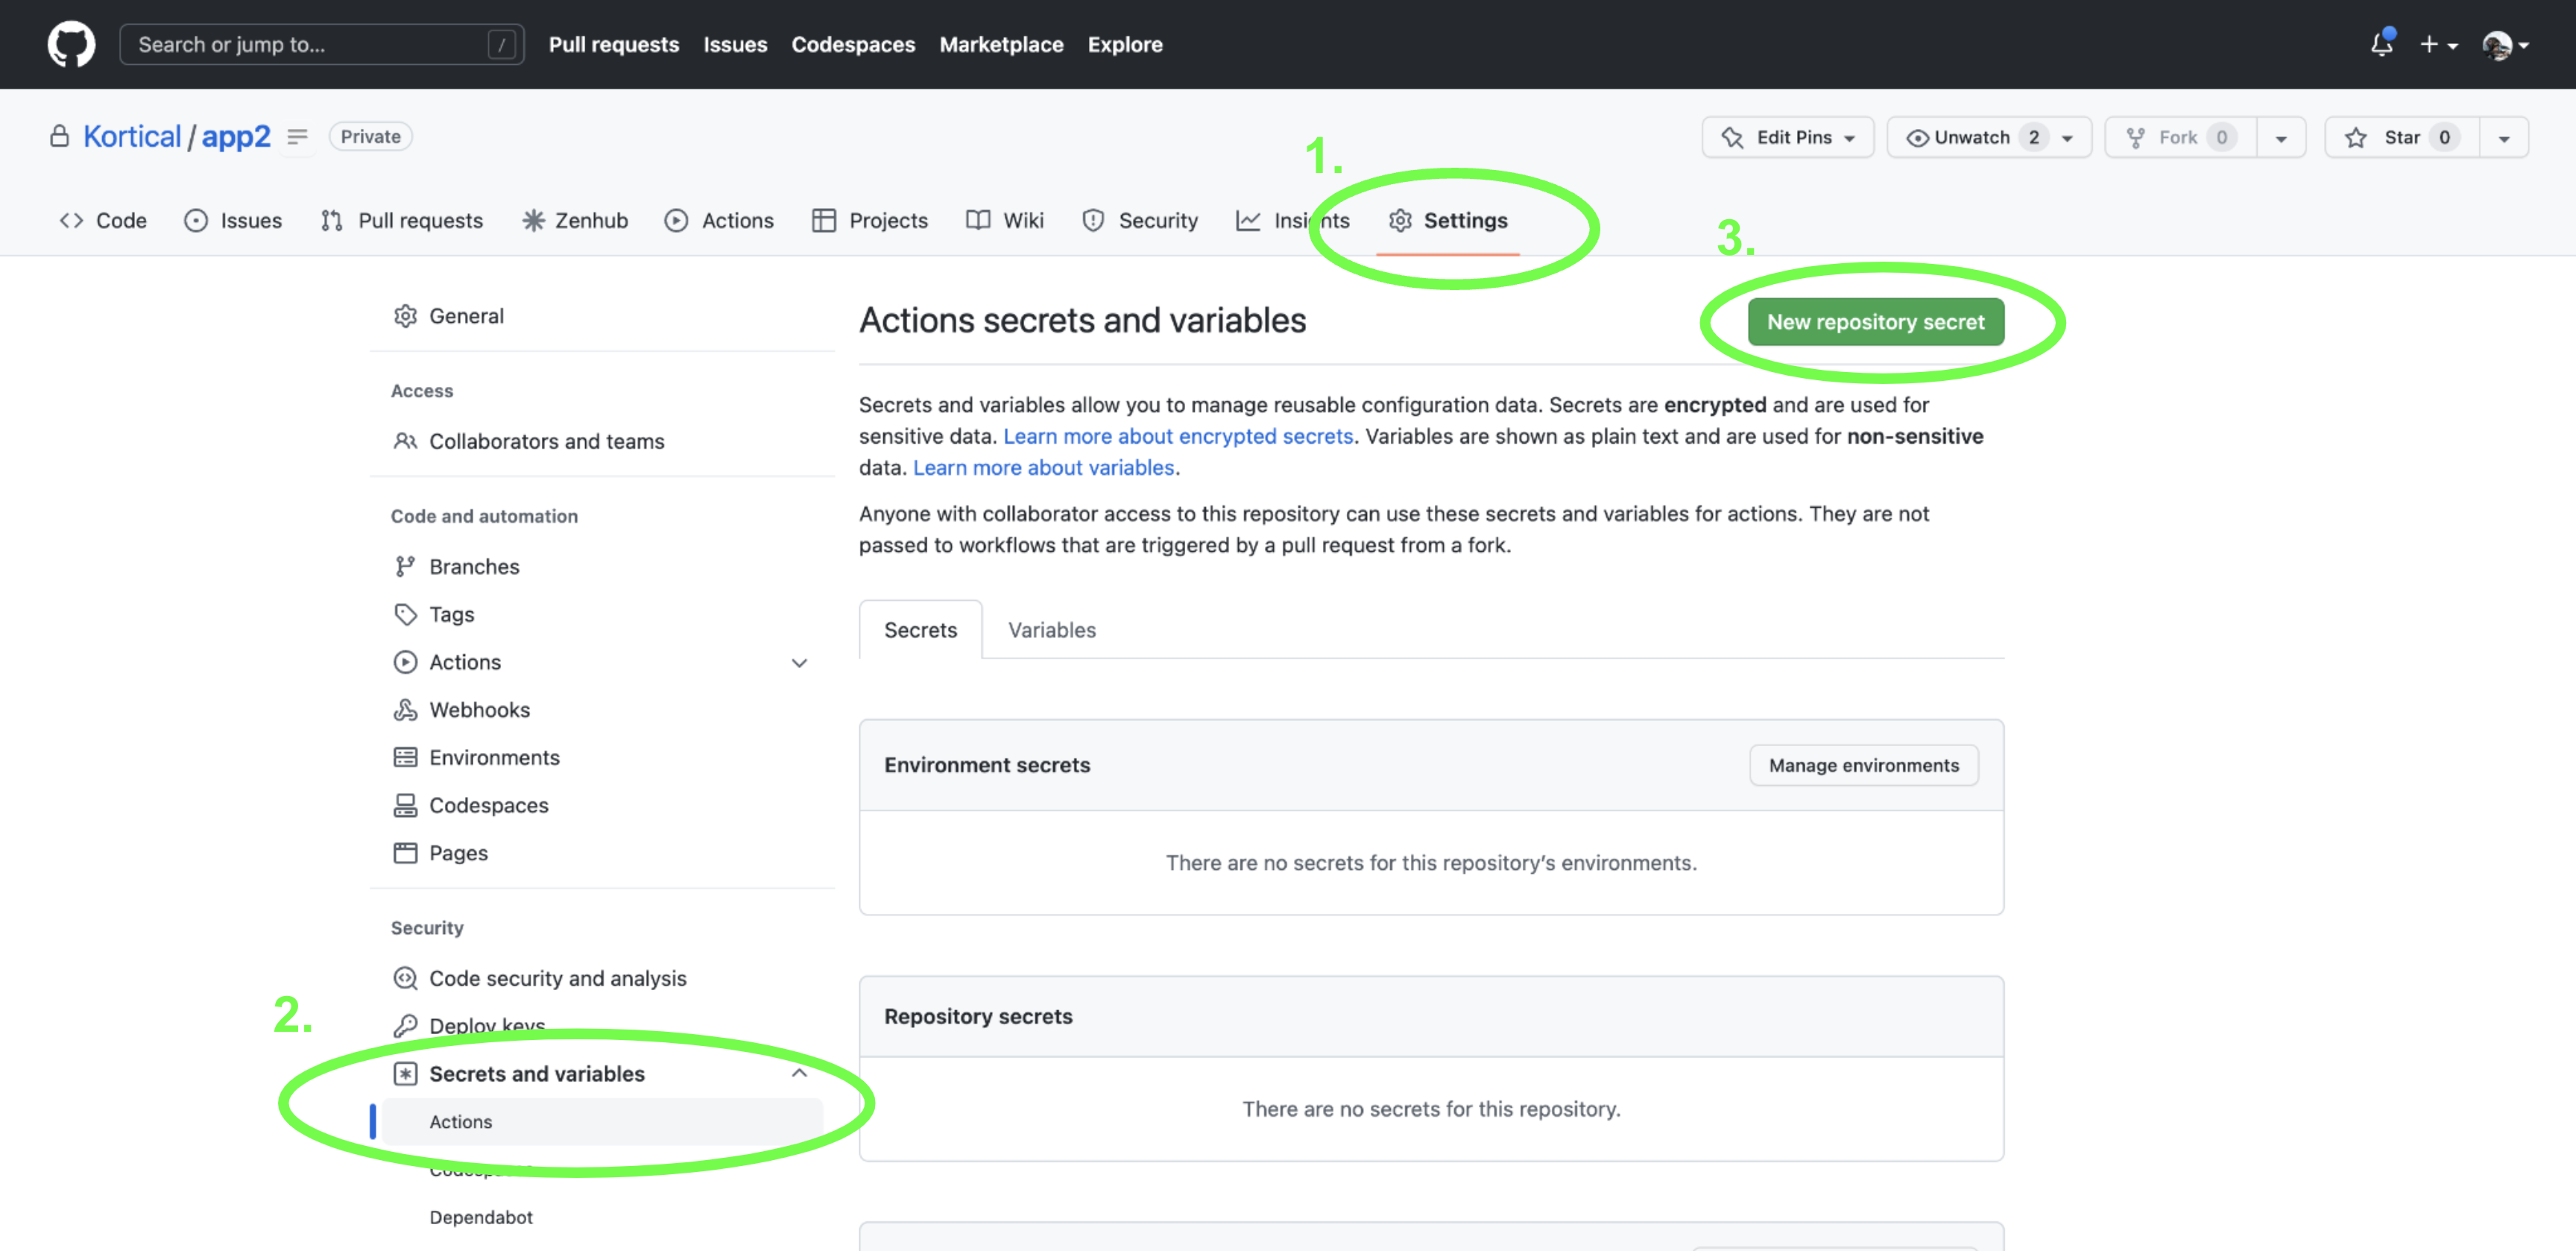
After entering your details, click add secret.
Once that’s done, it’s back to the CLI to do the initial commit. Make sure to say yes to save the component config. This config is the one that stores all of the correct component versions into git, to ensure that we can recreate the environment state for any commit.
> git add .
> git commit -m "initial commit"

system_url [https://platform.kortical.com/<company>/<system>], project [id [5], name [demo_app]], environment [id [69], name [<user>]]
Updating github workflows to point to the selected system and project
Components for environment [<user>] in project [demo_app]:
+-----+------------------+---------------------+------------------------+------------------------+--------------+----------------------+-----------------------+------------------------+
| id  |       name       |        type         |         status         |        created         | component_id | component_version_id |        project        |     environment        |
+=====+==================+=====================+========================+========================+==============+======================+=======================+========================+
| 162 | document_tagging | ComponentType.MODEL | ComponentInstanceState | 2023-01-22             | 2            | 154                  | id [5], name          | id [69], name [<user>] |
|     |                  |                     | .RUNNING               | 16:52:25.030483        |              |                      | [demo_app]            |                        |
+-----+------------------+---------------------+------------------------+------------------------+--------------+----------------------+-----------------------+------------------------+
| 164 | <app-name>       | ComponentType.APP   | ComponentInstanceState | 2023-01-22             | 4            | 157                  | id [5], name          | id [69], name [<user>] |
|     |                  |                     | .RUNNING               | 17:59:09.477725        |              |                      | [demo_app]            |                        |
+-----+------------------+---------------------+------------------------+------------------------+--------------+----------------------+-----------------------+------------------------+
Component config for environment [<user>]
components:
- component:
    component_version_id: 154
    name: document_tagging
    type: model
- component:
    app_config: 'data_file_name: "bbc_small.csv"

      api_key: changeme

      model_name: "document_tagging"

      target: "category"

      logo_image_url: ''static/images/k-logo.svg''

      app_title: ''ML Document Tagging''

      app_title_extension: ''- (<environment_name>)'''
    component_version_id: 157
    name: <app-name>
    type: app

--------
We did not find a component_config file at [config/component_config.yml].

This likely means it is your first time doing a commit for this app. The component
config stores all of the components and versions that are expected to run with
this commit of the code. Once this commit is merged to master, all of the
component versions listed here will be promoted to envionment [id [68],
name [Integration]], so it is important that we are saving the config from the right
environment.

Is this environment [id [69], name [<user>]], the environment you have been deployed
this app in for development / testing and validatated that it's working correctly?
[y/n]
> y
Then we need to set the remote git repository and push the code. Get the URL:
> gh repo view "<github-organization>/<app-name>" --json sshUrl --jq .sshUrl
Pass the output into the command below
> git remote add origin <output-of-command-above>
> git push --set-upstream origin master       # If you have a different version of git, your default might be main.
Congratulations, your app’s Continuous Integration is now fully configured! Once the tests have run, your model and app should be automatically promoted to the Integration environment. You can see the results of your CI tests by visiting the repository page on your browser, click Actions, and then select the commit you’ve just pushed. Once the CI workflow is complete, you can merge to master and start promoting through the environments.
The intended usage is that the user creates a branch, commits their code, opens a pull request, the tests run, and once they pass the code is committed.
Introduction to App/Model Versioning
(NB: This has changed substantially from the previous version of Kortical. The UI support for the new version is currently being built out, which will make this much easier.)
A huge part of maintaining a complex system is keeping track of code versions. With an integrated ML app + model, this need is magnified! We often make predictions which we can’t validate for several months and we need to adapt models rapidly to keep up with consumer and market changes. Being able to determine exactly what was run when and being able to redeploy old versions into test environments is hugely important.
Kortical aims to automate as much of this headache as possible.
Typically with an app or a model, it fulfills the same general function but evolves over time. Each iteration can be seen as a new version, but a version can be deployed to multiple environments, so we can call this an instance. We use this general pattern for apps and models.
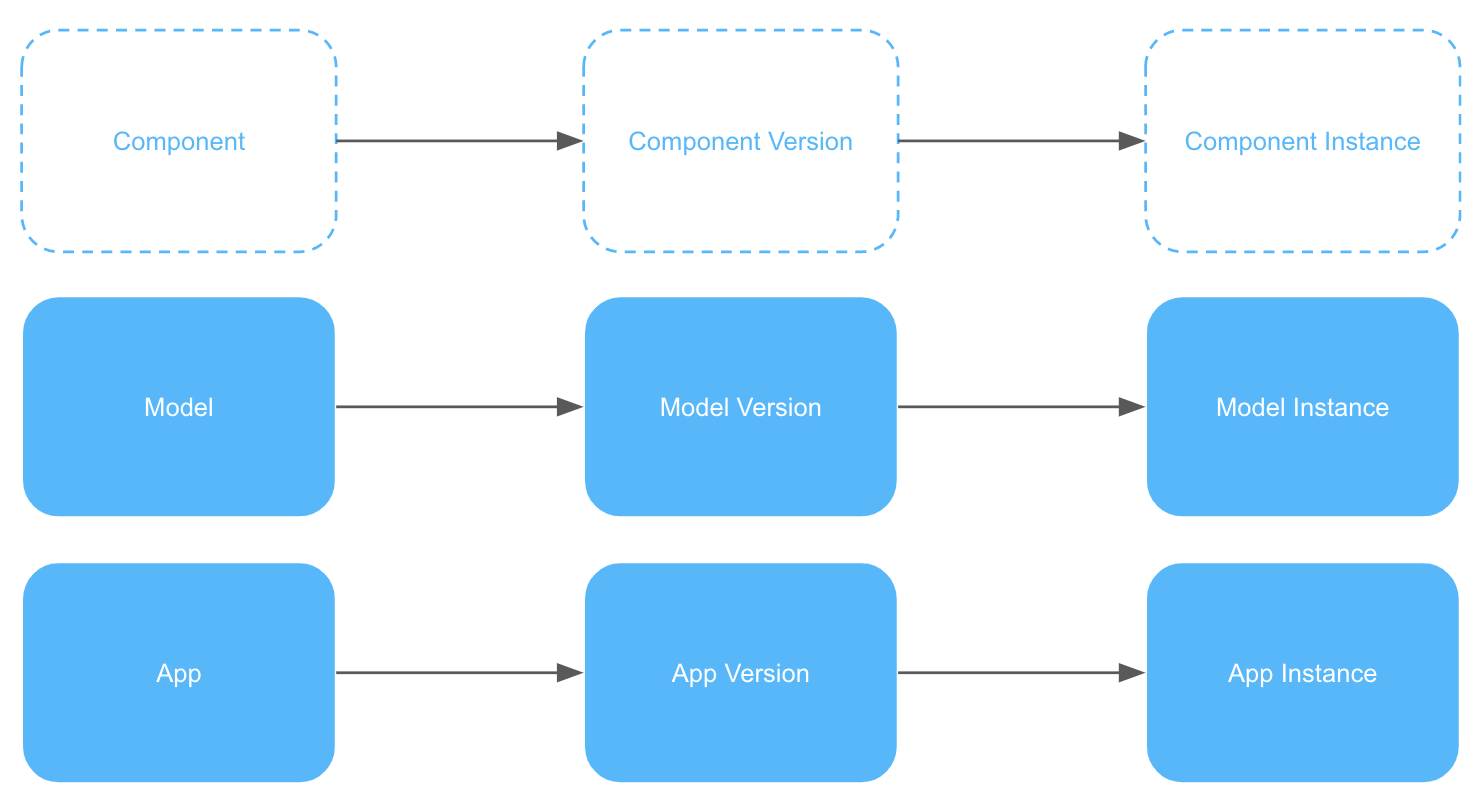
Every time you deploy an app or train models, candidate component versions are created. To see the versions for a specific app, we can use the version list command:
> kortical app version list

Apps deployed to Kortical:

	[1] appraisal-tool
	[2] document_tagging

Please select an option:
2

App:
+----+------------------+--------------------+----------------------------+
| id |      name        | default_version_id |          created           |
+====+==================+====================+============================+
| 2  | document_tagging | 80                 | 2023-01-26 09:51:08.362203 |
+----+------------------+--------------------+----------------------------+
Versions:
+----+------------------+------+---------+----------------------------+
| id |      name        | type | version |          created           |
+====+==================+======+=========+============================+
| 80 | document_tagging | app  | v1      | 2023-01-26 11:40:59.543528 |
+----+------------------+------+---------+----------------------------+
| 79 | document_tagging | app  | None    | 2023-01-26 09:51:08.460393 |
+----+------------------+------+---------+----------------------------+
If you have deployed your app more than once, you will notice that some versions do not have a real version number; this is because during development, you are likely to create many versions that do not work properly and should not be tagged.
When we commit a code change to master or publish from the model leaderboard:
- The component version gets tagged with a real version number (e.g
v1). - This becomes the new default version for the component.
The default version allows us to simply add components by name:
# Within a selected environment...
> kortical component add document_tagging --app
This command adds the default version of the app document_tagging (ID 80, version v1) to the selected environment, so we don’t always have to remember or list versions. In general:
- The default app version is the latest commit on master.
- The default model version is the most recent published from the model leaderboard in Kortical.
If you wanted to manually assign a version (let's say for ID 79), you could do this with the CLI:
> kortical app set-default-version document_tagging 79
Versions provide an easy and complete audit trail as we promote environments and replace specific components within an environment. It also makes rollback and recreating any previous state very easy.
Similar commands exist for models, e.g:
> kortical model version list
> kortical model set-default-version
# Promoting environments
There are 3 ways to promote an environment:
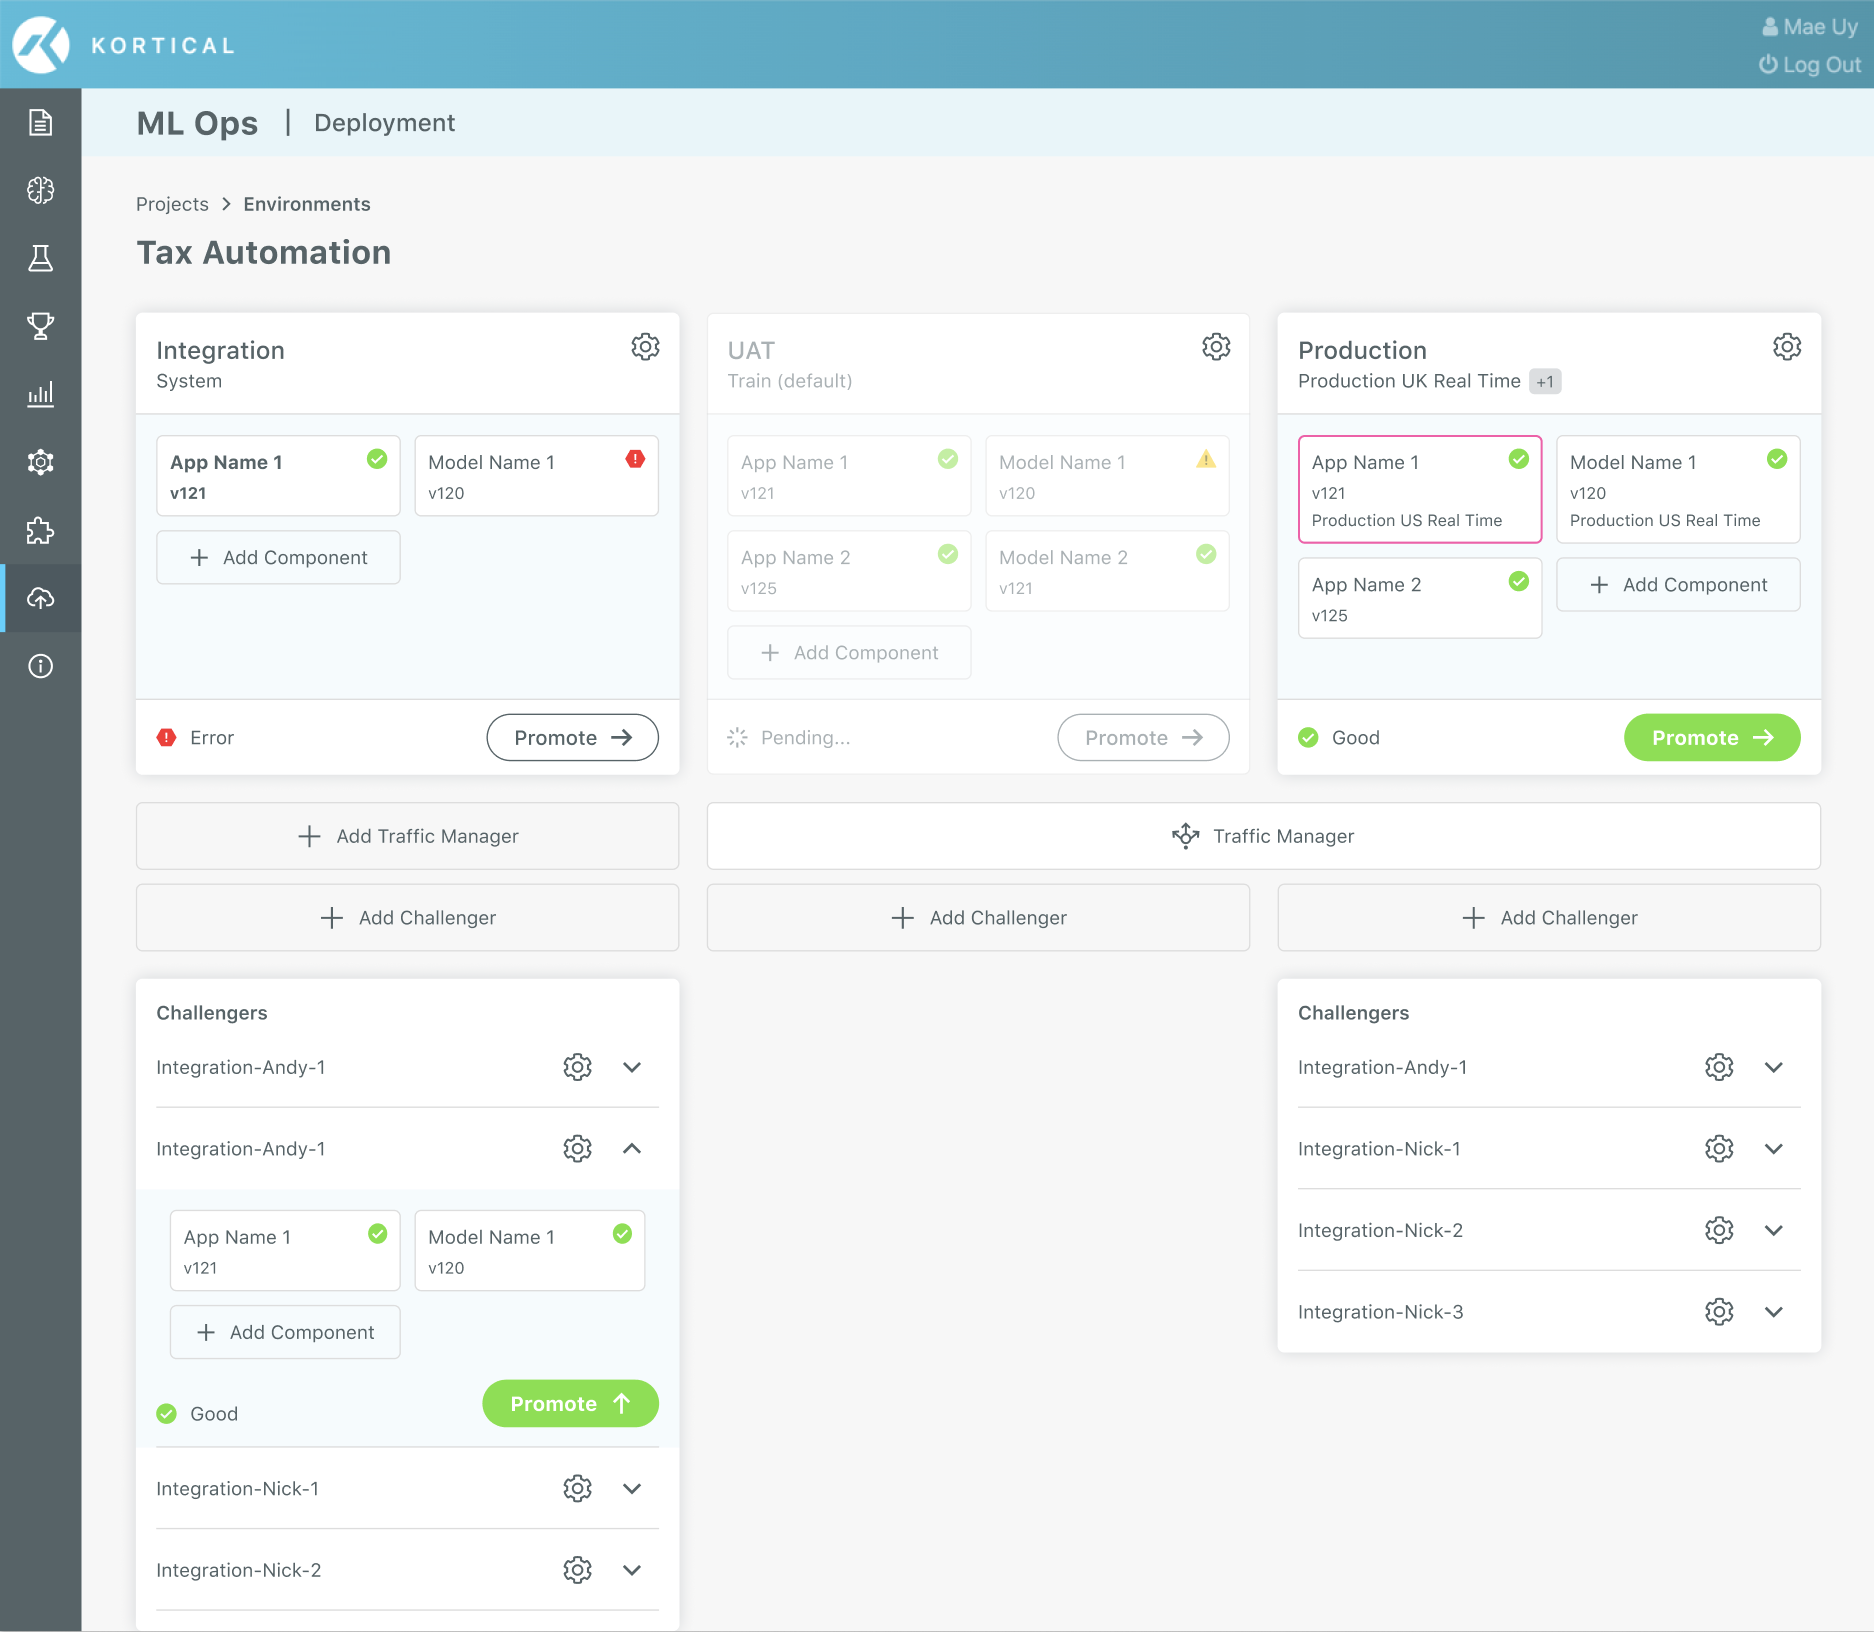
Method 1: Kortical
Promoting from the environments screen in Kortical will be available soon, the UI will look like this:
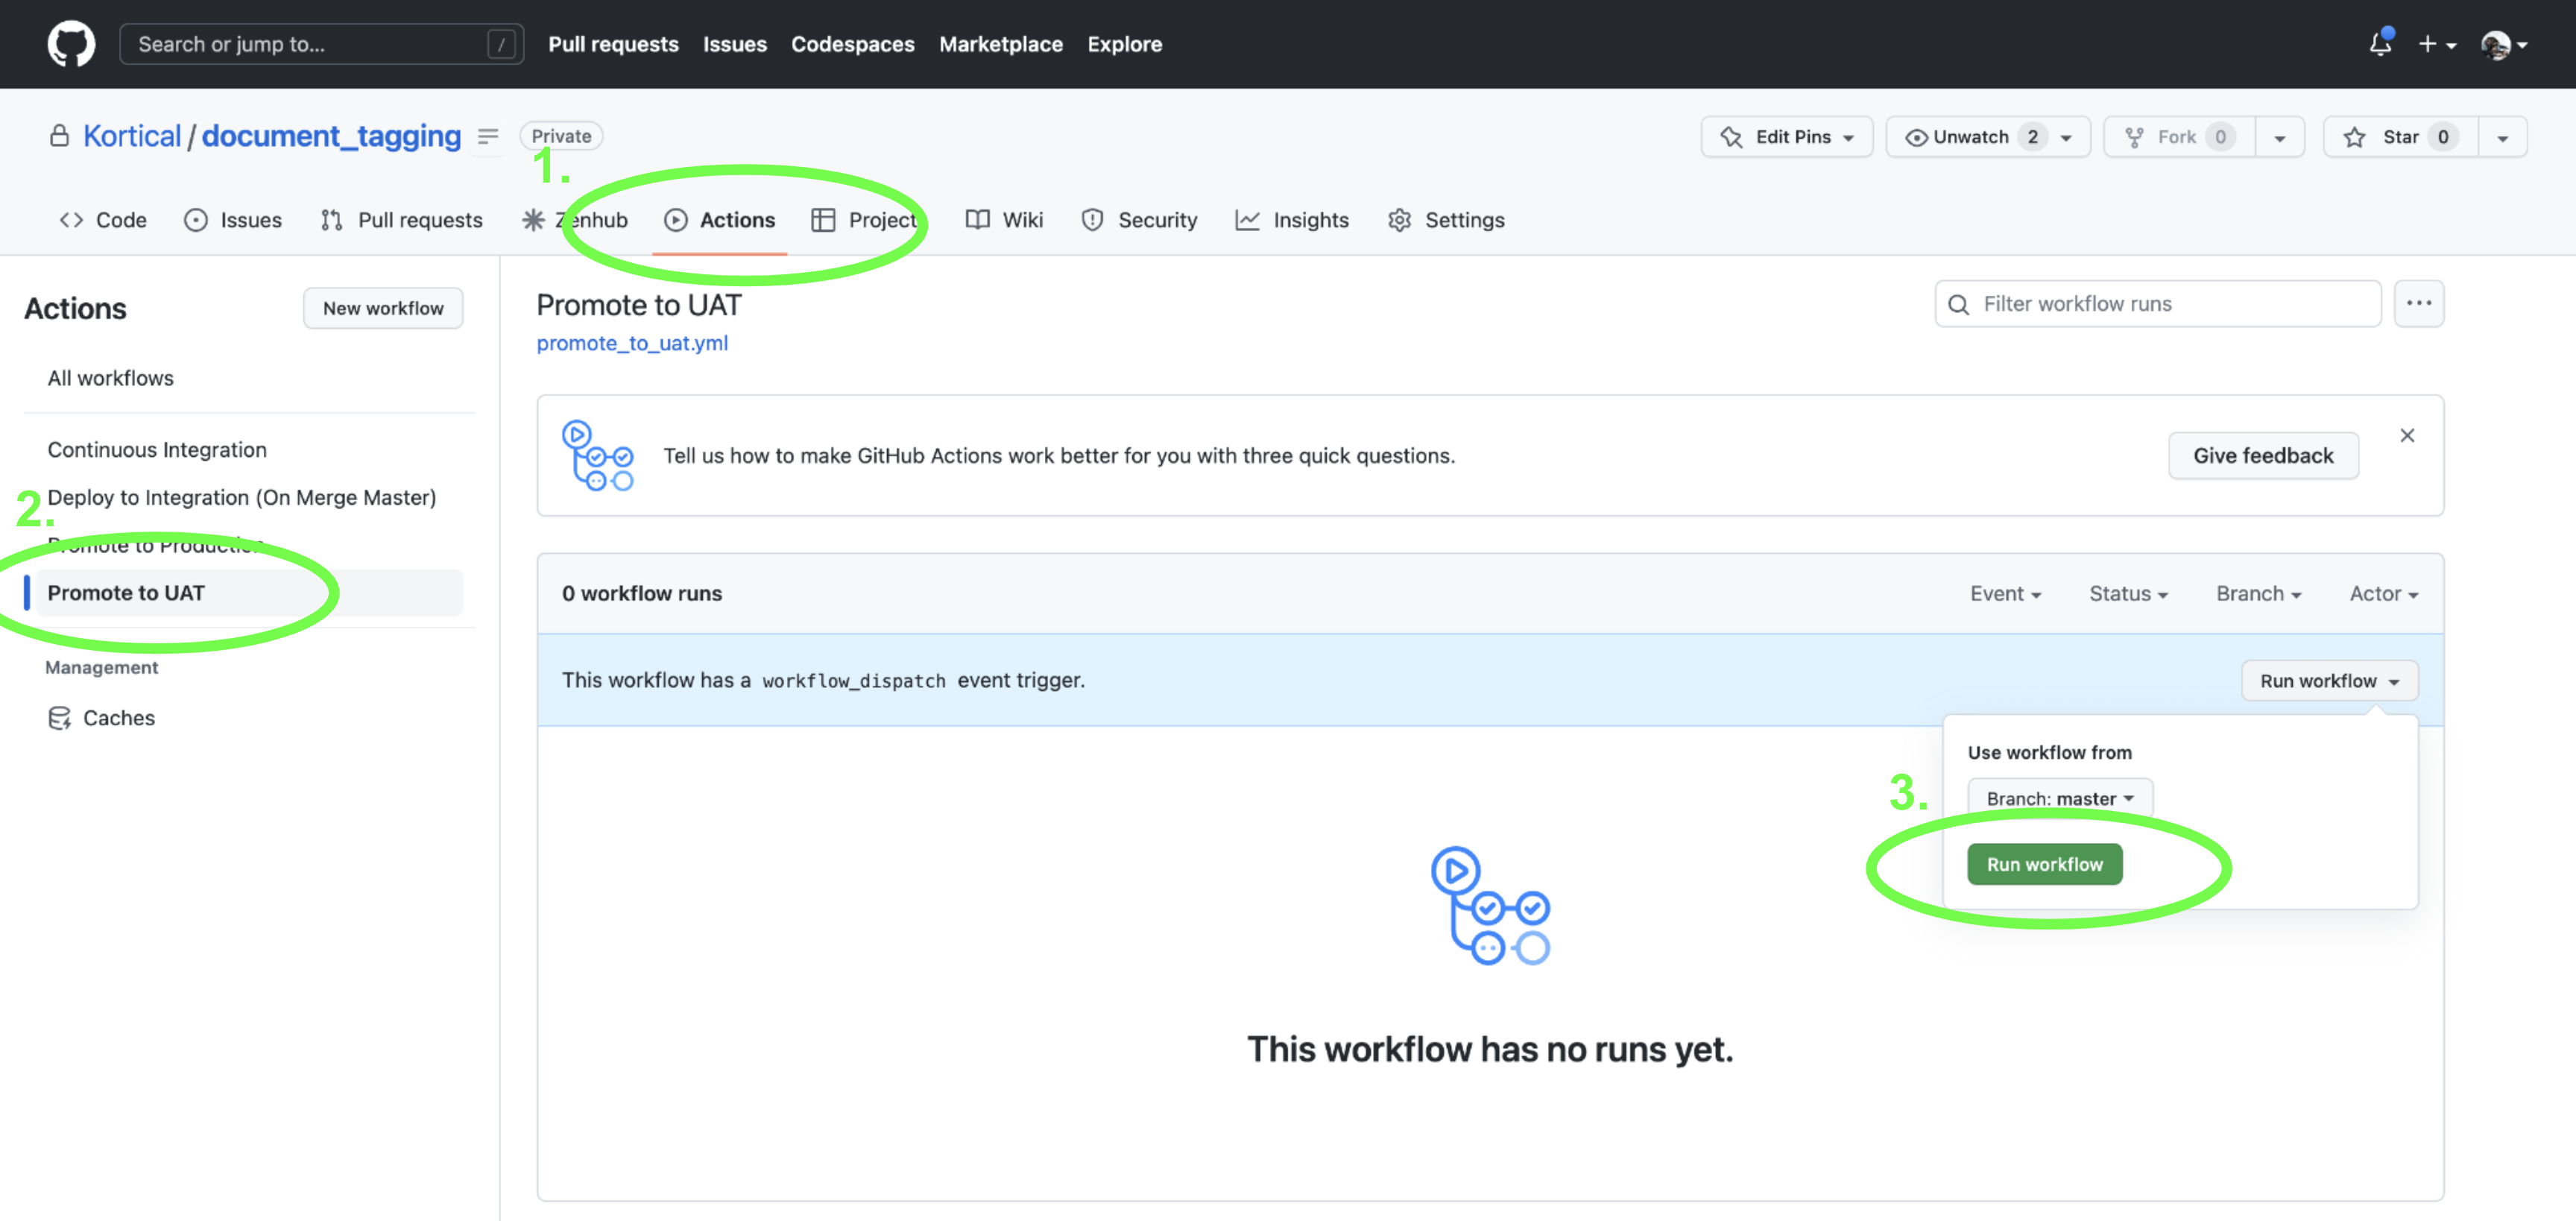
Method 2: Github
To promote from Github, select Actions and run the workflow:
Method 3: CLI
To promote via CLI, just navigate to your app folder and run:
> kortical environment select Integration
> kortical environment promote
From environment [Integration].
+----+-------------+----------------------------+-------------------------+----------------------------+
| id |    name     |          created           |         project         | promotes_to_environment_id |
+====+=============+============================+=========================+============================+
| 10 | Integration | 2023-01-24 02:13:42.091417 | id [3], name [demo_app] | 9                          |
+----+-------------+----------------------------+-------------------------+----------------------------+
Components for environment [Integration] in project [demo_app]:
+----+------------------+---------------------+--------------------------------+----------------------------+--------------+----------------------+-------------------------+-----------------------------+
| id |       name       |        type         |             status             |          created           | component_id | component_version_id |         project         |         environment         |
+====+==================+=====================+================================+============================+==============+======================+=========================+=============================+
| 22 | document_tagging | ComponentType.MODEL | ComponentInstanceState.RUNNING | 2023-01-24 11:02:30.331940 | 1            | 157                  | id [3], name [demo_app] | id [10], name [Integration] |
+----+------------------+---------------------+--------------------------------+----------------------------+--------------+----------------------+-------------------------+-----------------------------+
| 23 | document_tagging | ComponentType.APP   | ComponentInstanceState.RUNNING | 2023-01-24 11:02:30.352913 | 2            | 167                  | id [3], name [demo_app] | id [10], name [Integration] |
+----+------------------+---------------------+--------------------------------+----------------------------+--------------+----------------------+-------------------------+-----------------------------+
To environment [UAT].
+----+------+----------------------------+-------------------------+----------------------------+
| id | name |          created           |         project         | promotes_to_environment_id |
+====+======+============================+=========================+============================+
| 9  | UAT  | 2023-01-24 02:13:42.088241 | id [3], name [demo_app] | 8                          |
+----+------+----------------------------+-------------------------+----------------------------+
Components for environment [UAT] in project [demo_app]:
	No entries

Are you sure you want to promote environment [Integration] to environment [UAT]? (Y/n)
> y
That’s it, one simple command to deploy all of the models and apps in an environment. After promoting via CLI, it is a good idea to run the smoke tests to check everything is set up and working correctly:
> pytest -m "smoke"
This step is automated for the other methods.
# Running the app locally
For development, deploying the app to the cloud is overkill, so we often just want to run the app locally. Often the app will still require other deployed components, so we’ve created a light wrapper around the Python requests package:
from kortical.app import requests
from kortical.api.component_instance import ComponentType

data = {'text': 'Here is some text.'}

# If local, makes a call within your selected environment.
# If deployed, calls within its own environment.
response = requests.post("app_or_model_name", ComponentType.APP, '/endpoint?param1=value', json=data)

# This is a special request type for kortical model predictions (behaves as above)
df = pd.DataFrame()
df = requests.predict("model_name", df)
Now consider the environment and app config locally:
from kortical import environment
from kortical import app

# Uses whatever is deployed to Kortical
environment_config = environment.get_environment_config(format='yaml')

# Reads the contents of config/app_config.yml
app_config = app.get_app_config(format='yaml')
Environment config is always read from Kortical, as other deployed components might depend on it. However, app config is read directly from your config file because it is likely to change during development. Reading from file ensures you never have to deploy your app to get the right behaviour from it.
To run the app locally, select the right environment (probably your challenger) and then execute run_server.py:
# Name or id can be a regular environment or a challenger environment
> kortical environment select <environment-name-or-id>
> python local/run_server.py
# Reading app logs
Run kortical status to view your components:
> kortical status

Active config directory [/Users/owen-saldanha/git/test_apps/document_tagging/.kortical]
System url [https://platform.kortical.com/<company_name>/<system_name>]
User credentials [owen.saldanha@kortical.com]
Project [demo_app] selected.
+----+------------------+----------------------------+
| id |       name       |          created           |
+====+==================+============================+
| 1  |     demo_app     | 2023-01-24 11:42:27.183103 |
+----+------------------+----------------------------+
Environment [Integration-Owen] selected.
+----+------------------+----------------------------+---------------------------------+----------------------------+
| id |       name       |          created           |             project             | promotes_to_environment_id |
+====+==================+============================+=================================+============================+
| 4  | Integration-Owen | 2023-01-24 11:42:46.712201 | id [1], name [document_tagging] | 3                          |
+----+------------------+----------------------------+---------------------------------+----------------------------+
Components for environment [Integration-Owen] in project [demo_app]:
+----+-------------------+---------------------+--------------------------------+----------------------------+--------------+----------------------+---------------------------------+---------------------------------+
| id |     name          |        type         |             status             |          created           | component_id | component_version_id |             project             |           environment           |
+====+===================+=====================+================================+============================+==============+======================+=================================+=================================+
| 8  | document_tagging  | ComponentType.MODEL | ComponentInstanceState.RUNNING | 2023-01-24 14:00:47.996949 | 2            | 75                   | id [1], name [document_tagging] | id [4], name [Integration-Owen] |
+----+-------------------+---------------------+--------------------------------+----------------------------+--------------+----------------------+---------------------------------+---------------------------------+
| 4  |   <app-name>      | ComponentType.APP   | ComponentInstanceState.RUNNING | 2023-01-24 13:40:24.240215 | 3            | 32                   | id [1], name [document_tagging] | id [4], name [Integration-Owen] |
+----+-------------------+---------------------+--------------------------------+----------------------------+--------------+----------------------+---------------------------------+---------------------------------+
Component URLs for environment [Integration-Owen] in project [demo_app]:
model|nlp_model: https://platform.kortical.com/<company_name>/<system_name>/api/v1/projects/demo_app/environments/integration-owen/models/document_tagging/

app|<app-name>: https://platform.kortical.com/<company_name>/<system_name>/api/v1/projects/demo_app/environments/integration-owen/apps/<app-name>
Run the following to view your logs (this only works for “app”-type components):
> kortical component logs <app-name>

# Can also run this:
> kortical app logs <app-name>
# Recommended Development Workflow
The system is designed to fit into a workflow that uses branches and pull requests (PRs) as the main way that developers / data scientists share code.
# 1. Create a branch.
> git checkout -b <branch-name>

# You might need to set your upstream branch if you have not turned on autoSetupRemote
> git config --global push.autoSetupRemote true
# 2. Make changes locally.
Make changes locally, using run_server.py and unit tests to test.
> python local/run_server.py
Paste the following into your browser to access the app:

[http://127.0.0.1:5001?api_key=<api_key>]
> pytest -m "unit"
# 3. Deploy and test, using a challenger environment.
> kortical environment select <challenger-name-or-id>
> kortical app deploy
If it is a webservice it will be accessible at:

https://platform.kortical.com/<company>/<system>/api/v1/projects/demo_app/environments/<environment-name>/apps/<app-name>/

Deployment of [<app-name>] has been completed!
> pytest -m "integration"
# 3. Commit the code changes.
Commit code and update the component config. By way of example we could change the app_title to AI Article Classifier in config/app_config.yml.
> git add --all
> git commit -m "Commit message"

Would you like to overwrite your local component_config with the one from [<environment-name>]? [y/n] (If in doubt yes is probably the right answer)
> y
> git push
Updating the component config here allows us to capture the versions of the models and other apps in the environment you were developing against and ensure that those versions are committed along with the code.
Once you open a PR, the CI/CD workflow will run. This will build and deploy the app from code to test that the desired behaviour can be replicated on another machine with the code as checked in. It will also add create a commit with this version of the app. This is to help catch cases where you’ve made some code changes but potentially not actually deployed the app locally before committing. The new commit will be visible in Github.

When you merge the PR into master, it will again create a challenger from the component config versions, run the smoke tests on the challenger, deploy to Integration, then run the smoke tests again. This can help us catch any issues with merge conflicts prior to deployment.
# Exposing the API for other apps
By default, all of the apps are ready to be used as API services. Sometimes it’s more about the UI and sometimes the UI is just a simple dashboard to see what’s going on under the hood of the API service.
The API endpoints can be found in src/<app-name>/api/endpoints.py, you can add whatever you like to it:
# This endpoint is used by the kubernetes startup probe to check if the app is ready to serve requests
@app.route('/health', methods=['get'])
def health():
    return {"result": "success"}

### Your API endpoints here

@app.route('/predict', methods=['post'])
@safe_api_call
def predict():
    input_text = request.json['input_text']
    request_data = {
        'text': [input_text]
    }
    df = pd.DataFrame(request_data)
    # Do custom pre-processing (data cleaning / feature creation)
    df = requests.predict(model_name, df)
    # Do custom post-processing
    predicted_category = df['predicted_category'][0]

    return Response(predicted_category)
Shown above are the two default API endpoints: /health and /predict. These are flask endpoints, for more details on how to set up new endpoints, check out the Flask Quick Start Guide (opens new window). The simplest way to call these endpoints is to use our requests SDK from an app in the same environment or a folder / venv with the Kortical package initialised.
from kortical.api.component_instance import ComponentType
from kortical.app import get_app_config
from kortical.app import requests
from document_tagging.api.http_status_codes import HTTP_OKAY

app_config = get_app_config(format='yaml')
api_key = app_config['api_key']

@pytest.mark.integration
@pytest.mark.smoke
def test_index():
    response = requests.get('document_tagging', ComponentType.APP, f'/?api_key={api_key}')
    assert response.status_code == HTTP_OKAY, response.text
    assert '<body' in response.text

@pytest.mark.integration
@pytest.mark.smoke
def test_predict_endpoint():
    response = requests.post('document_tagging', ComponentType.APP, f'/predict?api_key={api_key}', json={"input_text": "Here is some text"})
    assert response.status_code == HTTP_OKAY, response.text
The available component types are ComponentType.APP and ComponentType.MODEL.
Sometimes it isn’t always practical to use this requests package, like when an external system is calling our app. In these cases, call the endpoints by the full URLs:
from kortical.app import requests
from document_tagging.api.http_status_codes import HTTP_OKAY

api_key = "ce17bb77-fbb7-41da-8978-19f085f367a1"

@pytest.mark.integration
@pytest.mark.smoke
def test_index():
    response = requests.get(f'https://platform.kortical.com/<company>/<system>/api/v1/projects/demo_app/environments/<environment-name>/apps/<app-name>/?api_key={api_key}')
    assert response.status_code == HTTP_OKAY, response.text
    assert '<body' in response.text


@pytest.mark.integration
@pytest.mark.smoke
def test_predict_endpoint():
    response = requests.post(f'https://platform.kortical.com/<company>/<system>/api/v1/projects/demo_app/environments/<environment-name>/apps/<app-name>/predict?api_key={api_key}', json={"input_text": "Here is some text"})
    assert response.status_code == HTTP_OKAY, response.text
Note
We also have an OAuth implementation for users that require a higher level of security.
# Scaling up hardware for Production
WARNING
Scaling up compute will incur extra cost.
The main considerations when thinking about how to allocate hardware are:
- Stability - We generally want to isolate production systems, so they are not affected by what is happening in development and other environments.
- Failover - We want at least 2 of each service, so if one goes down the other can keep serving.
- Throughput - Is there enough capacity to serve the volume of requests we receive? If the average request takes 100ms, each computer has 4 CPUs for 4 parallel requests and we have 1,000,000 per hour, then we’d need at least 7 computers to keep up with the throughput.
- Latency - Even if we have enough capacity for the throughput, sometimes we have situation where the number of requests spikes and a bunch of requests come at once. Often to meet SLAs and maintain a quality user experience, we have to worry about the average or max latency of requests.
What is a worker group?
In Kortical, a worker group is a set of computers of a given specification (e.g number of cores, RAM, GPU). You can configure various tasks, projects and environments to run on a specific worker group. For example, you might want to dedicate one worker group for training models and another for a Production environment, so performance by one is not affected by the other.
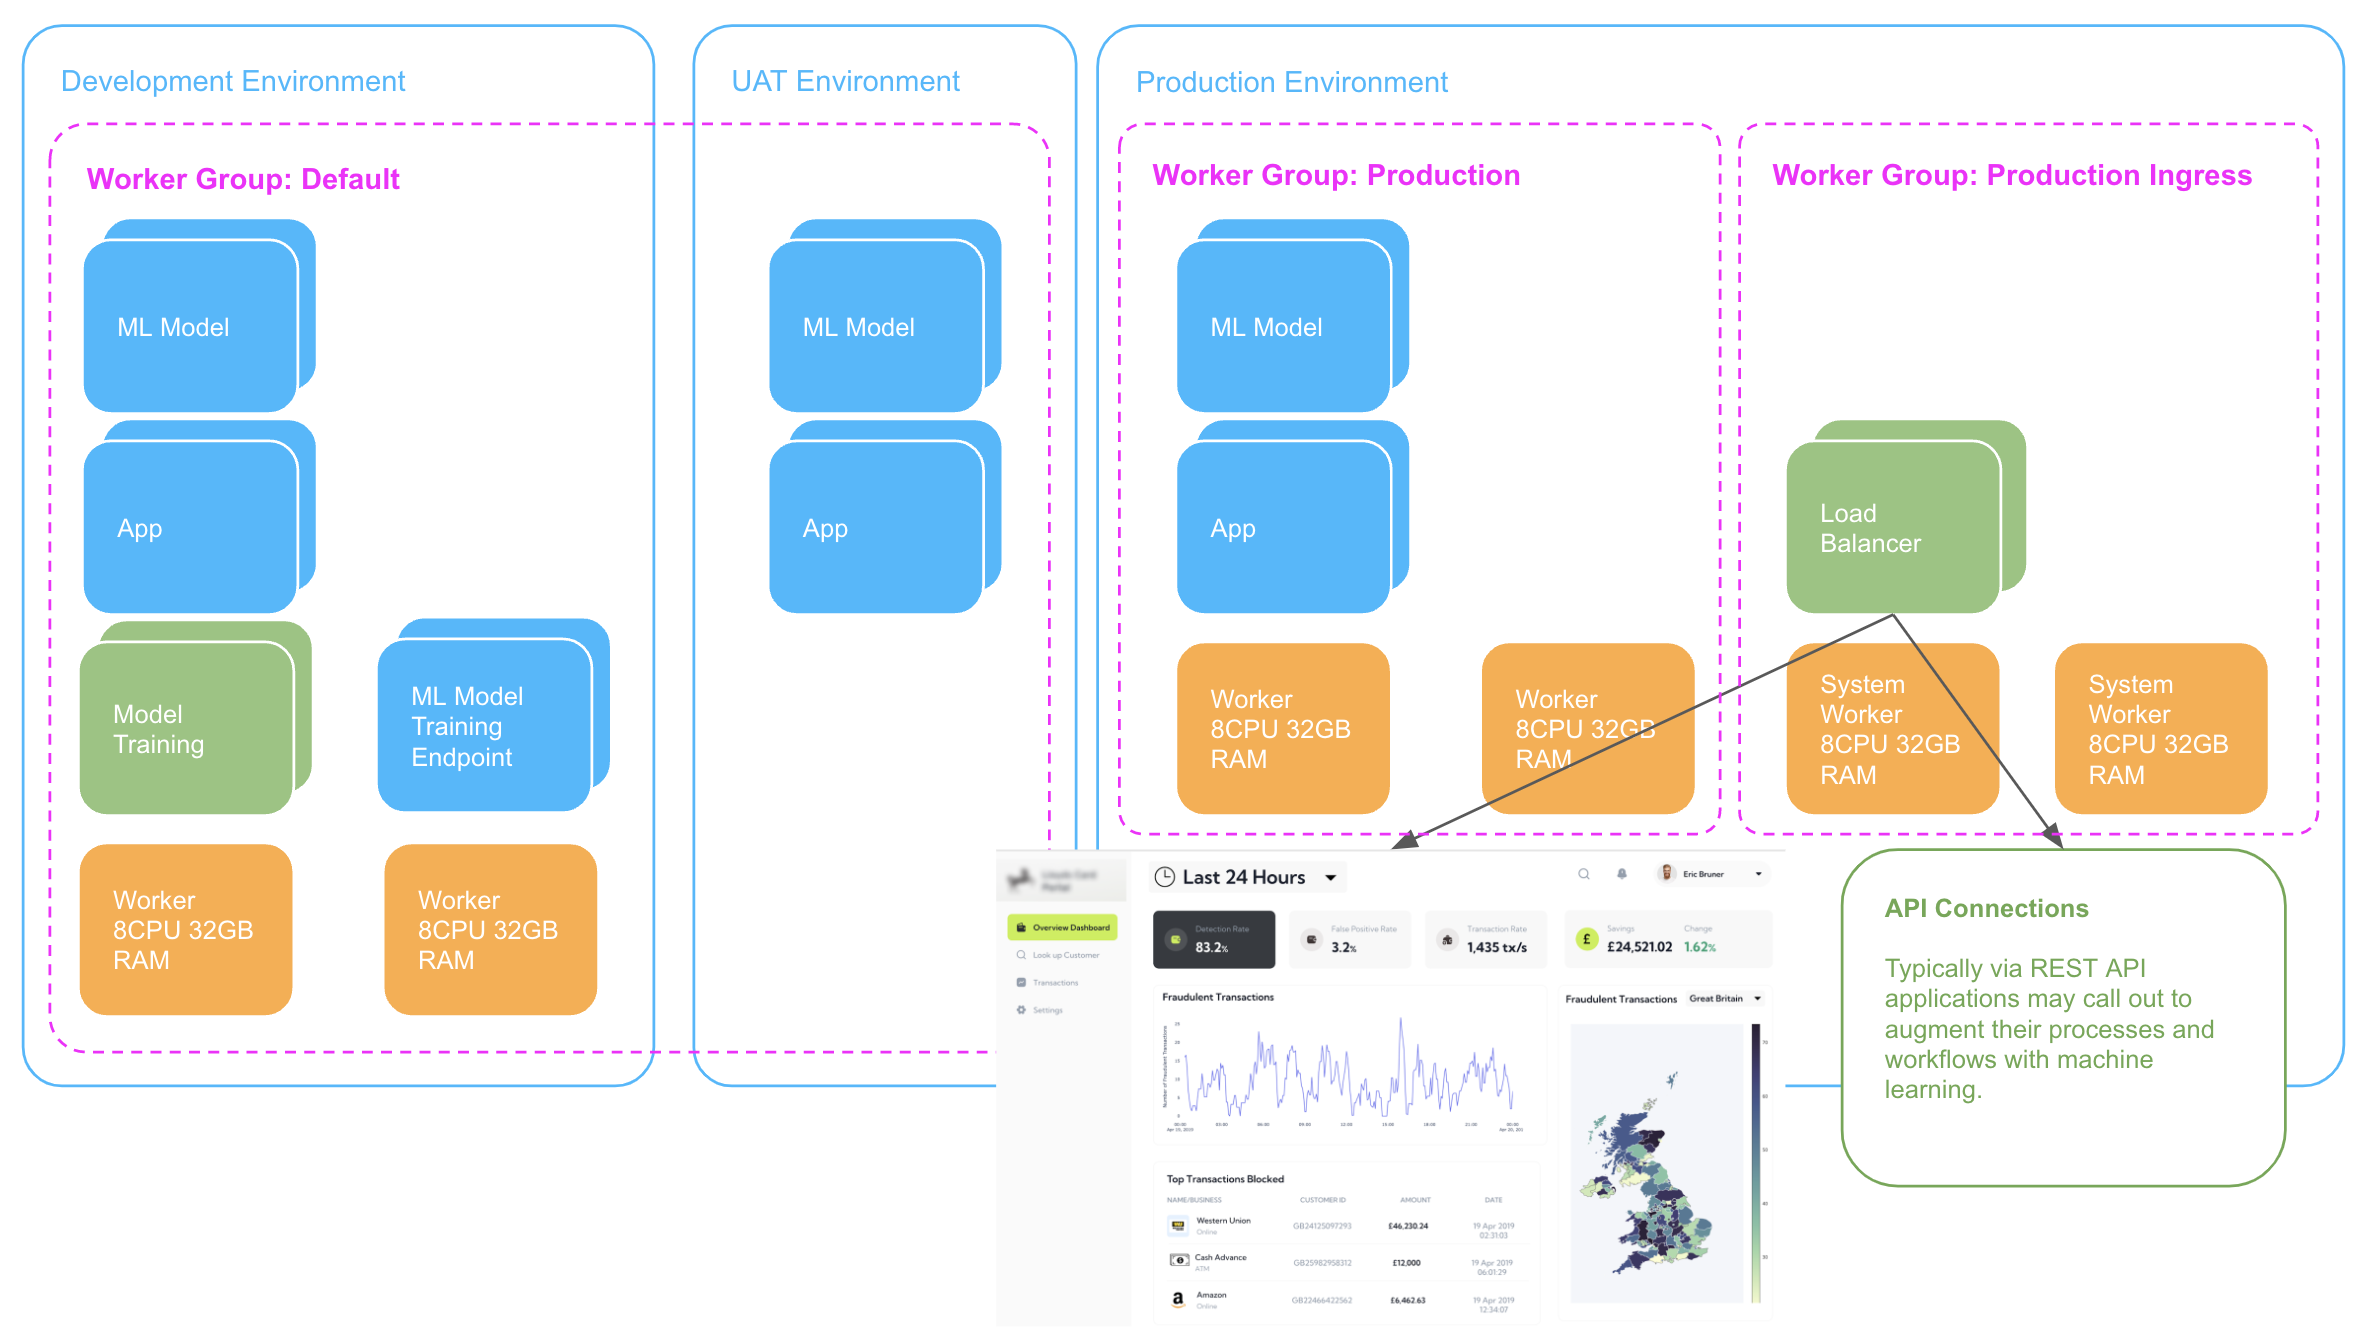
The diagram above shows 3 environments:
- The Development/UAT environments are sharing the same Worker Group: Default.
- The Production environments has 2 worker groups: Production and Production Ingress.
We can configure worker groups at the Company, Project and Component Instance level, by default everything uses the Company default. If we set a worker group for an environment, every component in that environment will use it, unless it is explicitly overridden at the component instance level. This makes it super easy for us to configure and control what hardware everything runs on
Let’s follow the steps below to isolate our production environment onto its own worker group.
# 1. Create a worker group.
Create the new worker group in the CLI (the default specification or larger & size 2 is recommended for a Production environment):
> kortical worker -h
> kortical worker create document_tagging_prod
Worker Types:
+----------------------+
|     worker_type      |
+======================+
| 2-CPU-13GB-RAM       |
+----------------------+
| 2-CPU-16GB-RAM-AMD   |
+----------------------+
| 4-CPU-26GB-RAM       |
+----------------------+
| 4-CPU-32GB-RAM-AMD   |
+----------------------+
| 8-CPU-52GB-RAM       |
+----------------------+
| 8-CPU-64GB-RAM-AMD   |
+----------------------+
| 16-CPU-104GB-RAM     |
+----------------------+
| 16-CPU-128GB-RAM-AMD |
+----------------------+
| 32-CPU-208GB-RAM     |
+----------------------+
| 32-CPU-256GB-RAM-AMD |
+----------------------+
Please enter the exact name of a worker type from the list above or leave blank to use the default [4-CPU-26GB-RAM]:
> 2-CPU-13GB-RAM
How many workers would you like in the worker group?
> 2
Worker Groups:
+----+------------------------+------------------+----------------+--------------+---------------+
| id |    name                |      state       |  worker_type   | current_size | required_size |
+====+========================+==================+================+==============+===============+
| 1  | system                 | Running          | 4-CPU-26GB-RAM | 3            | 3             |
+----+------------------------+------------------+----------------+--------------+---------------+
| 2  | default                | Running          | 4-CPU-26GB-RAM | 3            | 3             |
+----+------------------------+------------------+----------------+--------------+---------------+
| 10 | document_tagging_prod  | Creating         | 2-CPU-13GB-RAM | 0            | 2             |
+----+------------------------+------------------+----------------+--------------+---------------+
Worker group [document_tagging_prod] is being created; this may take time to scale up and become fully operational.
# 2. Assign the worker group to Production.
Select the Production environment:
> kortical project select document_tagging
> kortical environment select Production
To view the current worker group, run:
> kortical environment kortical-config list

Environment [Production] selected.
+----+------------+----------------------------+---------------------------------+----------------------------+
| id |    name    |          created           |             project             | promotes_to_environment_id |
+====+============+============================+=================================+============================+
| 1  | Production | 2023-01-24 11:42:27.199732 | id [1], name [document_tagging] | None                       |
+----+------------+----------------------------+---------------------------------+----------------------------+
Kortical Config for [Production]:
+------------------+---------+-----------+
|       key        |  value  | inherited |
+==================+=========+===========+
| replicas         | 2       | true      |
+------------------+---------+-----------+
| worker_group     | default | true      |
+------------------+---------+-----------+
| low_latency_mode | false   | true      |
+------------------+---------+-----------+
Definitions:
- Replicas - this is the number of pods each component will have when deployed to this environment. Applies to both apps and models.
- Worker Group - this is the worker group on which this environment will be hosted.
- Low-latency mode - for models only. This will reduce prediction request times, but at the expense of less logging.
To change the worker group, run:
> kortical environment kortical-config set worker_group document_tagging_prod
Production environments typically receive more traffic, so we should also scale up the number of replicas for our components. This increases the amount of parallel requests that can be served (The default is 2):
> kortical environment kortical-config set replicas 4
Kortical config is a versatile way of setting up configurations for groups of components (e.g at a global/project/environment/component level). Should you ever want to unset the change you have just made, you can inherit config like this:
> kortical environment kortical-config inherit worker_group

# Environment will now have the same worker group as the project.
To delete the worker group, run:
> kortical worker delete document_tagging_prod

The worker group [document_tagging_prod] will be deleted - Proceed? [y/N]
y
Worker group [document_tagging_prod] was deleted.
