# How to build a Model Retraining Pipeline
Note
To make it easier to flick back and forth, it's often useful to click the link to this doc and open in a new tab.
# Overview
This guide covers how to create a model that can be retrained automatically as more data is collected over time. This will be achieved by creating an ML app that wraps the model and integrates it into a pipeline. The pipeline will pull in data from an external source and transform it, train a new model, then test and compare it with the existing model before deploying.
In doing so we'll also cover off:
- Using the Kortical platform & SDK to manage data transformation pipelines for models
- Custom API wrappers for models
- Projects & Environments (Full replicated cloud workspaces, with automatic version tracking, hardware management, etc.)
- Continuous Integration & Deployment
As a demonstration, we will consider some bookkeeping data that classifies transactions under various tax categories.
PRE-REQUISITIES
This tutorial assumes that you are using:
- Google Bigquery. You will require a service account key that has access to your project's Bigquery datasets.
- Kortical SDK. Refer to the Kortical SDK documentation setup page, which details a range of installation methods depending on your operating system and preferences.
# Creating The App and Project
The steps below show how to create the app from a template and setup the project using the Kortical platform. It mimics the steps in this section of the ML Ops - Deployment How to Guide. For clarity, some of the details are not repeated here.
# 1. Create a codebase for your app.
Create the app, selecting the retraining template (we will use the name bookkeeping_retrain in this guide):
> kortical app create bookkeeping_retrain
Available app templates:

	[1] web_app_template
	[2] openai_llm_template
	[3] retrain_template
	[4] bigquery_app_template
	[5] excel_app_template

Please select an option:
3
Retrieving template [retrain_template] to current working directory. Path to template project will be [/Users/owen-saldanha/git/test_apps/bookkeeping_retrain].
Created [retrain_template] template for [bookkeeping_retrain] at [/Users/owen-saldanha/git/test_apps/bookkeeping_retrain].
This will create a folder in your current directory.
# 2. Create a virtual environment for the app.
Although you may have already created a venv for running the Kortical package, the requirements for your app may clash with your currently installed libraries. It is strongly recommended to create a new venv for each app folder that is created, so running code locally is quick and easy.
Deactivate your current environment and enter the app directory. Create a python 3.9 venv:
> cd <your_app_name>
> which python3.9
> <path-to-python3.9>/python3.9 -m venv venv
> source venv/bin/activate
> cd <your_app_name>
> where python3.9
> <path-to-python3.9>/python3.9 -m venv venv
> copy "venv\Scripts\python.exe" "venv\Scripts\python3.exe"
> venv\Scripts\activate.bat
// Make sure to add code blocks to your code group
This will create a venv called venv, to create a venv with a different name change the last parameter.
Next, install the requirements:
> pip install -r requirements.txt
> pip install -e .
Note
All further steps assume that we’re in the app directory and have its venv activated. To activate a venv: source <path-to-venv>/bin/activate, to exit a venv: deactivate.
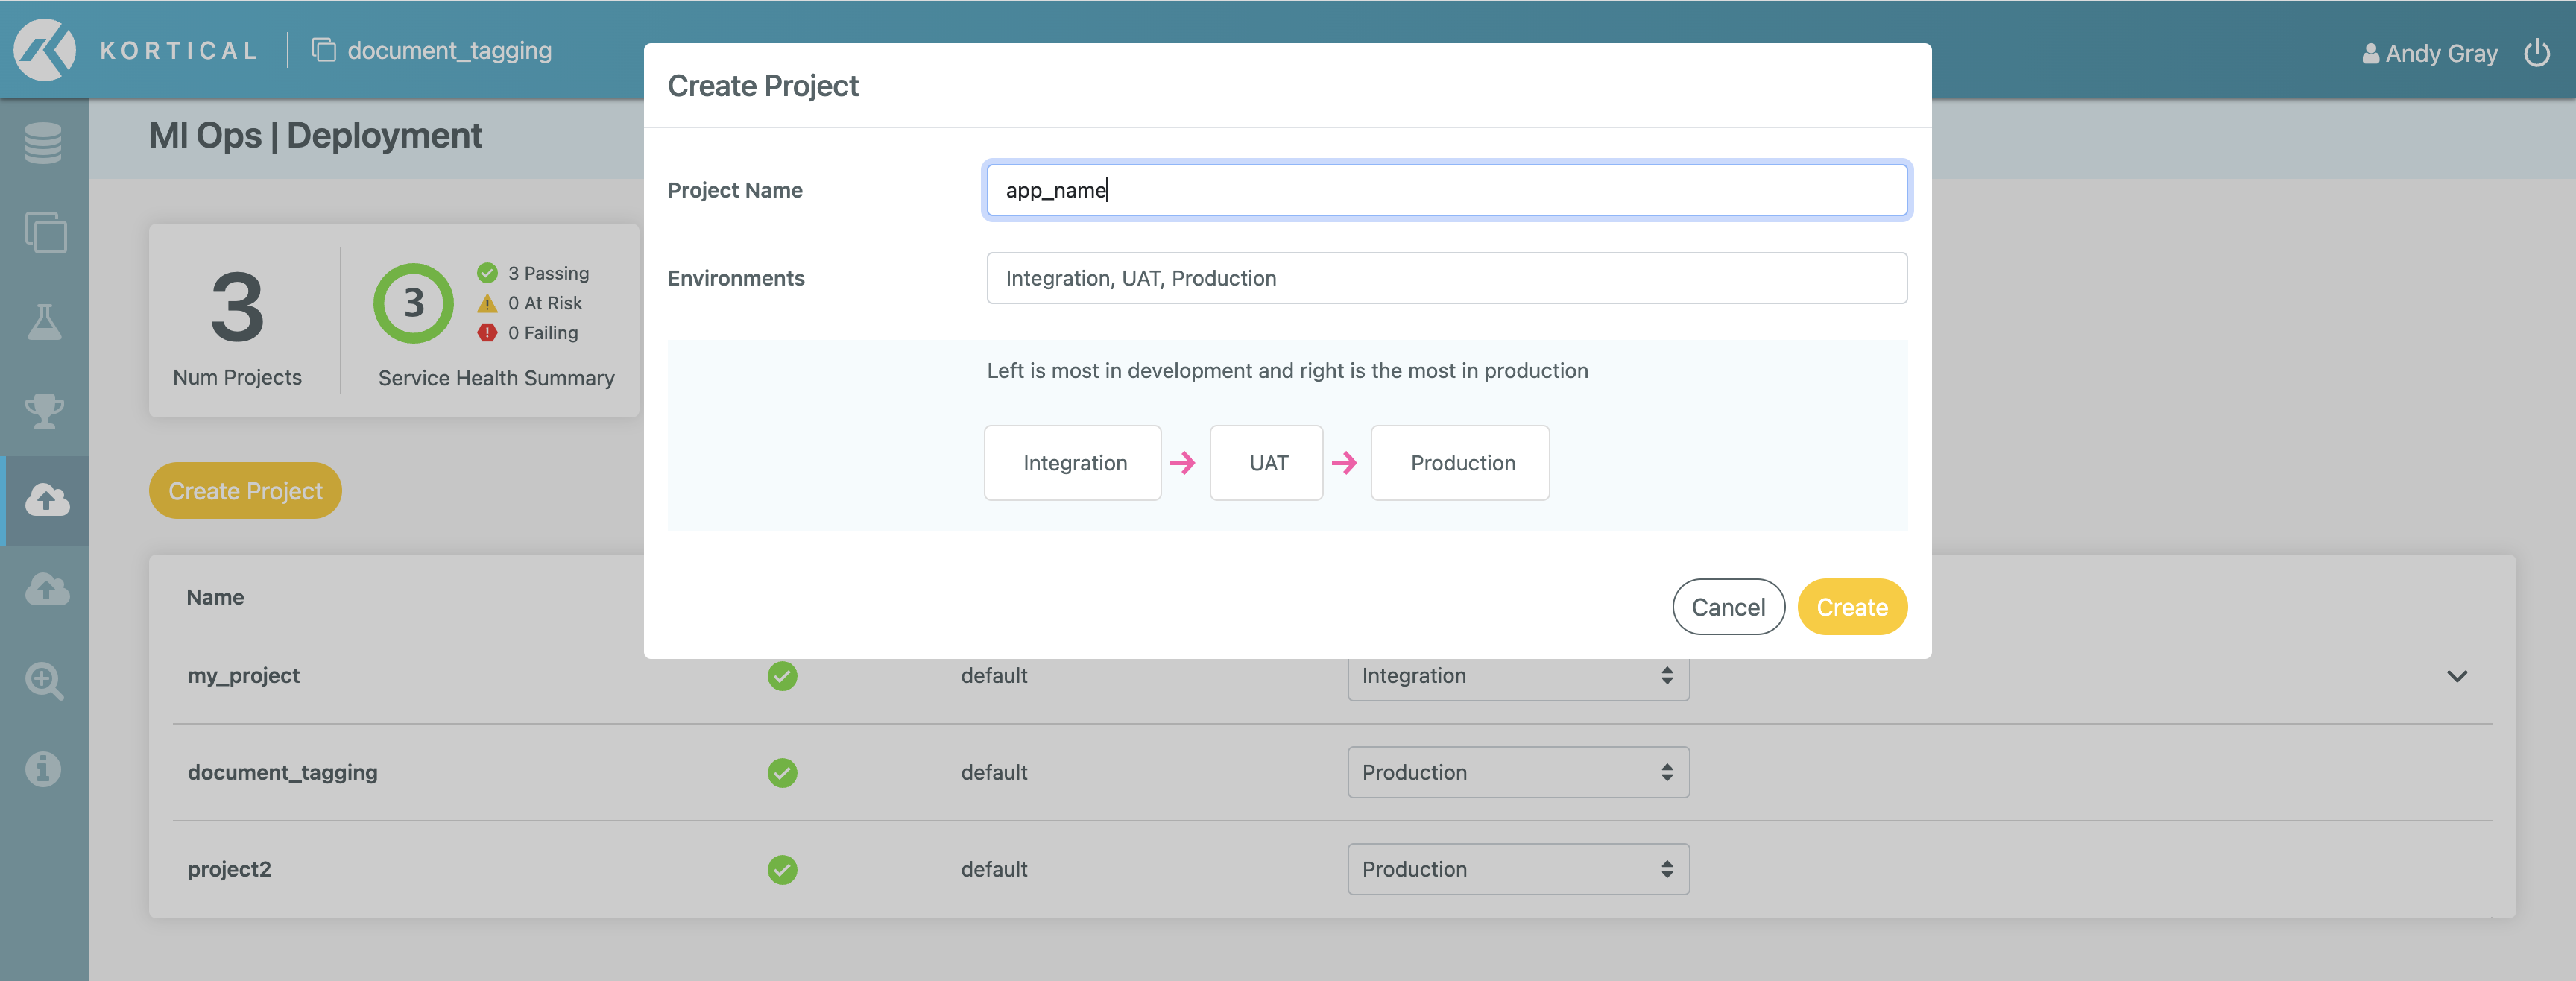
# 3. Create a Kortical project.
Navigate to the MLOps | Deployment screen in the platform and click Create Project. Enter a suitable name (we will use model_retrain):
# 4. Select the project.
We’re going to initialise Kortical again. Doing this for each app imitates the git/github pattern so it is easy to switch between projects. As the state for selected system, project and environment are all held in here:
> kortical config init
Select the project (if unsure, run kortical project list to view all projects):
> kortical project select model_retrain
Project [model_retrain] selected.
+----+---------------+---------------------+
| id |     name      |       created       |
+====+===============+=====================+
| 1  | model_retrain | 2023/12/05 10:46:30 |
+----+---------------+---------------------+
Environments in project [model_retrain]:
+----+-------------+---------------------------+----------------------------+---------------------+------------------------------+
| id |    name     |  promotes_to_environment  |         created_by         |       created       |           project            |
+====+=============+===========================+============================+=====================+==============================+
| 3  | Integration | id [2], name [UAT]        | owen.saldanha@kortical.com | 2023/12/05 10:46:30 | id [1], name [model_retrain] |
+----+-------------+---------------------------+----------------------------+---------------------+------------------------------+
| 2  | UAT         | id [1], name [Production] | owen.saldanha@kortical.com | 2023/12/05 10:46:30 | id [1], name [model_retrain] |
+----+-------------+---------------------------+----------------------------+---------------------+------------------------------+
| 1  | Production  | None                      | owen.saldanha@kortical.com | 2023/12/05 10:46:30 | id [1], name [model_retrain] |
+----+-------------+---------------------------+----------------------------+---------------------+------------------------------+
Environment [Integration] selected.
+----+-------------+-------------------------+---------------------+------------------------------+
| id |    name     | promotes_to_environment |       created       |           project            |
+====+=============+=========================+=====================+==============================+
| 3  | Integration | id [2], name [UAT]      | 2023/12/05 10:46:30 | id [1], name [model_retrain] |
+----+-------------+-------------------------+---------------------+------------------------------+
(app-venv) MacBook-Pro:bookkeeping_retrain owen-saldanha$
As a result of doing kortical config init for this folder, this will not affect other repositories which have a different project selected. Selecting a project will also automatically select the first environment within that project.
# Configuring the App
# 1. Set the app config.
App config allows you to make changes to high-level settings used by the app, without having to redeploy the code.
Examine the file config/app_config.yml:
log_level: 20
api_key: changeme

app_title: 'Model Retraining App'
logo_image_url: 'static/images/k-logo.svg'

bigquery:
  dataset_name: 'bookkeeping_retrain'
  table_name: 'data'

model_name: 'bookkeeping'
target: 'Account_Name'
number_of_train_workers: 3
max_minutes_to_train: 5
max_models_with_no_score_change: 20
Change the api_key to secure the app; we recommend generating a UUID (e.g ce17bb77-fbb7-41da-8978-19f085f367a1) which you can do here (opens new window).
TIP
We have also used the app config file to specify which Bigquery table we are pulling data from and which model is being trained. If you have an existing database and model, update the fields here. To stay with the guide, leave it unchanged (there are local scripts we will run to set this up).
WARNING
For demo purposes, the app config has the fields max_minutes_to_train and max_models_with_no_score_change set to small values to ensure a fast train run. This must be changed for a production environment.
# 2. Set your Bigquery credentials.
Locate the blank file config/service_account_key.json, and paste in your key. it should look something like this:
### This not a real key, just an example.
{
  "type": "service_account",
  "project_id": "<project-id>",
  "private_key_id": "688056cq93572h9357f103d4b066f866c14daf",
  "private_key": "-----BEGIN PRIVATE KEY-----\nMIIEvAIu...etc...cjO/n2kv0w==\n-----END PRIVATE KEY-----\n",
  "client_email": "service-account-name@project-id.iam.gserviceaccount.com",
  "client_id": "1110348504810102050415",
  "auth_uri": "https://accounts.google.com/o/oauth2/auth",
  "token_uri": "https://oauth2.googleapis.com/token",
  "auth_provider_x509_cert_url": "https://www.googleapis.com/oauth2/v1/certs",
  "client_x509_cert_url": "https://www.googleapis.com/robot/v1/metadata/x509/new-retrain-demo%40kloud-238615.iam.gserviceaccount.com",
  "universe_domain": "googleapis.com"
}
Once that's done, run the script local/bigquery/set_service_account_key.py, which sets this key as a secret in Kortical. To view it, use the CLI:
> kortical secret get bigquery_service_account_key
# Creating the Database and Model
TIP
If you have an existing database, make sure you have updated the app config then skip step 1.
# 1. Create your Bigquery database (optional).
Run the following scripts:
> python local/bigquery/create_database.py
> python local/bigquery/upload_data_to_bigquery.py
This will create a dataset and table and populate it with data from data/dataset_1.csv. You should be able to see the new dataset in the Google Cloud Console:

# 2. Create the Model.
Run the following script to launch a model training run:
> python local_retrain.py
The steps in this workflow are:
- Fetch the latest data from Bigquery - the app pulls the entire table's contents at the current time and splits it into a train/test set.
- Train the model - the app uses the Kortical SDK and model code to launch a train run; when training stops, the best model is deployed to a development environment for testing.
- Compare and update model - the development model is evaluated on the test set and compared to the existing deployed model (run
kortical component listto see this). If the new model is better, it is deployed and replaces the inferior model.
This workflow will take a while to finish, so let's move on to deploying the app.
TIP
If you are using the example dataset, this workflow will work out of the box; if using an existing database, you may need to tweak the workflow's pre/post processing steps.
# Deploying the App
This codebase contains not one app, but three! See the k8s folder:
bookkeeping_retrain- this is the main API server, containing the relevant endpoints for training and predictions.celery_worker,celery_redis- these are required so that the pipeline runs on a background worker, freeing up the app so it can continue to serve predictions.
Run the following to deploy all apps:
> kortical app deploy
Apps found in local directory [/Users/owen-saldanha/git/test_apps/bookkeeping_retrain]:

	[1] bookkeeping_retrain
	[2] celery_redis
	[3] celery_worker
	[4] all

Please select an option:
4
WARNING: You are about to deploy an app to the [Integration] environment!
Are you sure you want to continue? [y/N]
y

Starting Docker build for bookkeeping_retrain...
etc...
Note
On MacOS/Linux, you may need to start a SSH agent; to do this, run eval $(ssh-agent).
This will take a while to build the first time, however the Dockerfile is structured such that subsequent deployments for code changes should be very fast.
You must also scale the celery_redis component to 1 replica, like this:
> kortical component kortical-config set replicas 1 celery_redis
Once the deploy command has finished, we’ll see some output like:
Waiting for environment [Integration] to be ready...
Waiting for status [Running] on app instance [bookkeeping_retrain], environment [Integration], project [model_retrain]
Waiting for status [Running] on app instance [celery_redis], environment [Integration], project [model_retrain]
Waiting for status [Running] on app instance [celery_worker], environment [Integration], project [model_retrain]
Deployment complete!
Apps deployed to environment [Integration]:
+----+---------------------+----------------+------+---------+---------------------+----------------------------+------------------------------+
| id |        name         |    version     | type | status  |       created       |        environment         |           project            |
+====+=====================+================+======+=========+=====================+============================+==============================+
| 1  | bookkeeping_retrain | id [1] v[None] | app  | Running | 2023/12/05 11:14:42 | id [3], name [Integration] | id [1], name [model_retrain] |
+----+---------------------+----------------+------+---------+---------------------+----------------------------+------------------------------+
| 2  | celery_redis        | id [2] v[None] | app  | Running | 2023/12/05 11:14:42 | id [3], name [Integration] | id [1], name [model_retrain] |
+----+---------------------+----------------+------+---------+---------------------+----------------------------+------------------------------+
| 3  | celery_worker       | id [3] v[None] | app  | Running | 2023/12/05 11:14:43 | id [3], name [Integration] | id [1], name [model_retrain] |
+----+---------------------+----------------+------+---------+---------------------+----------------------------+------------------------------+
Component URLs for environment [Integration] in project [model_retrain]:
app|bookkeeping_retrain: https://platform.kortical.com/<company-name>/<system-name>/api/v1/projects/model_retrain/environments/Integration/apps/bookkeeping_retrain/
# Testing the App and Model
Open the URL for the bookkeeping_retrain app in a browser (remember to add ?api_key=<api-key> at the end) to see the UI:
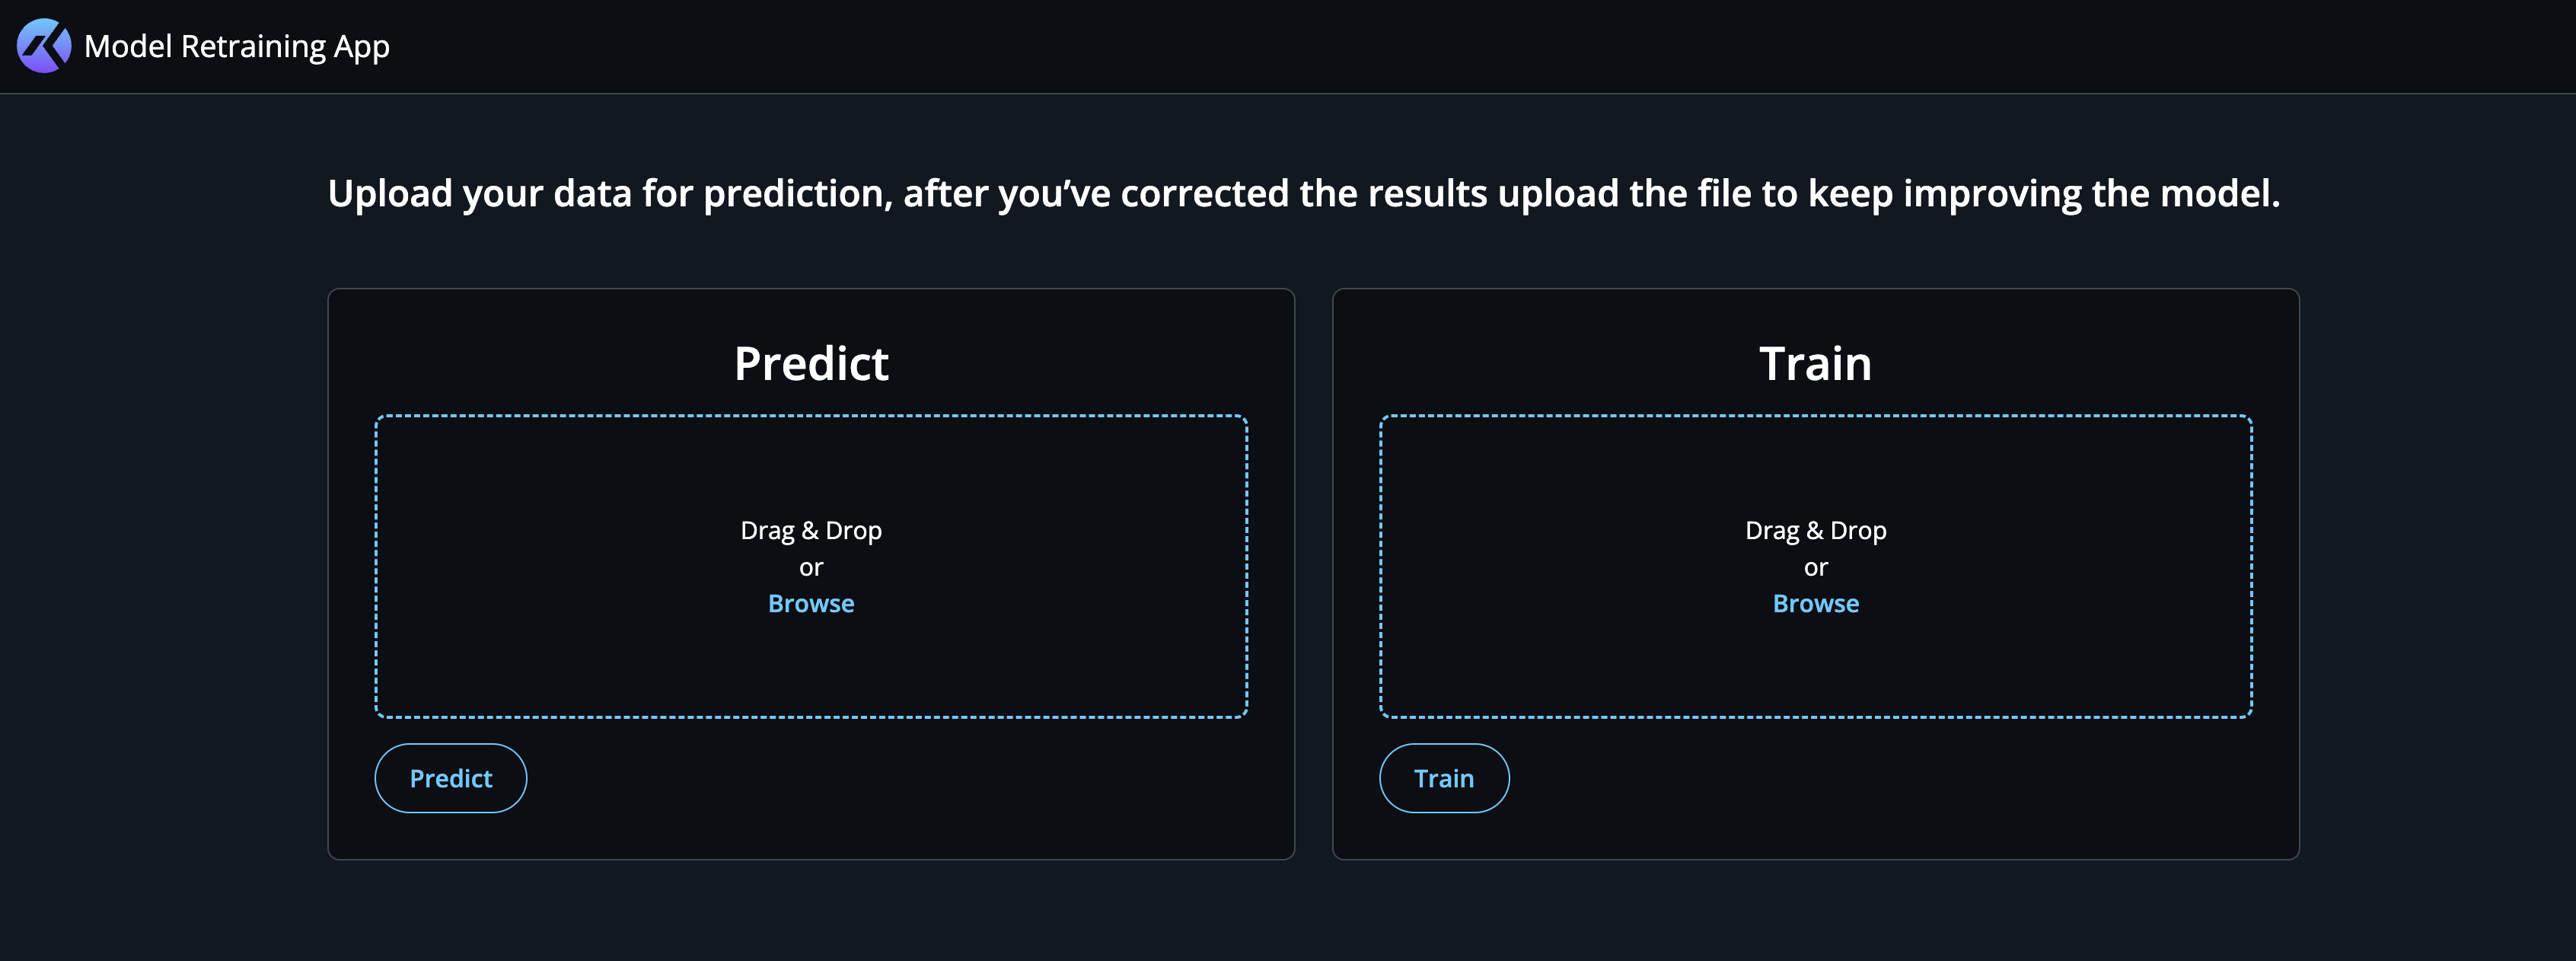
At this point, we have set up all the necessary components for the model retrain pipeline; time to test it with new data! Use the file data/dataset_2.csv (or whatever file your model expects) and follow these steps:
- Upload the file to the panel on the left-hand side, and click
Predict. This will use the deployed model to retrieve predictions for the uploaded data, and trigger a download. - Examine the downloaded file, and correct any of the predictions (this is not necessary for the example data, which already has the correct target labels).
- Upload the corrected predictions file to the panel on the right-hand side, and click
Train. This will append the new data to the bigquery table, and trigger the train workflow again. The newly trained model will likely outperform the existing model and be deployed to the environment.
If for any reason you don't want to use the UI, you can run the following scripts to achieve the same results:
> python local/online_learning.py
> python local/retrain_in_cloud.py
After the workflow ends, we should see a new model deployed to the selected environment:
> kortical component list

Project [model_retrain] selected.
+----+---------------+---------------------+
| id |     name      |       created       |
+====+===============+=====================+
| 1  | model_retrain | 2023/12/05 10:46:30 |
+----+---------------+---------------------+
Environment [Integration] selected.
+----+-------------+-------------------------+---------------------+------------------------------+
| id |    name     | promotes_to_environment |       created       |           project            |
+====+=============+=========================+=====================+==============================+
| 3  | Integration | id [2], name [UAT]      | 2023/12/05 10:46:30 | id [1], name [model_retrain] |
+----+-------------+-------------------------+---------------------+------------------------------+
Components for environment [Integration] in project [model_retrain]:
+----+---------------------+----------------+-------+---------+----------------------------------------------------+---------------------+----------------------------+------------------------------+
| id |        name         |    version     | type  | status  |                     created_by                     |       created       |        environment         |           project            |
+====+=====================+================+=======+=========+====================================================+=====================+============================+==============================+
| 9  | bookkeeping         | id [5] v[2]    | model | Running | app-celeryworker-delretrain-ration-service-account | 2023/12/05 12:21:40 | id [3], name [Integration] | id [1], name [model_retrain] |
+----+---------------------+----------------+-------+---------+----------------------------------------------------+---------------------+----------------------------+------------------------------+
| 1  | bookkeeping_retrain | id [1] v[None] | app   | Running | owen.saldanha@kortical.com                         | 2023/12/05 11:14:42 | id [3], name [Integration] | id [1], name [model_retrain] |
+----+---------------------+----------------+-------+---------+----------------------------------------------------+---------------------+----------------------------+------------------------------+
| 2  | celery_redis        | id [2] v[None] | app   | Running | owen.saldanha@kortical.com                         | 2023/12/05 11:14:42 | id [3], name [Integration] | id [1], name [model_retrain] |
+----+---------------------+----------------+-------+---------+----------------------------------------------------+---------------------+----------------------------+------------------------------+
| 3  | celery_worker       | id [3] v[None] | app   | Running | owen.saldanha@kortical.com                         | 2023/12/05 11:14:43 | id [3], name [Integration] | id [1], name [model_retrain] |
+----+---------------------+----------------+-------+---------+----------------------------------------------------+---------------------+----------------------------+------------------------------+
We can also view a full list of model versions:
> kortical model version list bookkeeping

Model:
+----+-------------+---------+-------+------------+-----------------+--------------------+----------------------------+---------------------+
| id |    name     | status  | score | score_type | default_version | train_worker_group |         created_by         |       created       |
+====+=============+=========+=======+============+=================+====================+============================+=====================+
| 4  | bookkeeping | Running | 0.869 | f1_score   | id [5] v[2]     | default            | owen.saldanha@kortical.com | 2023/12/05 11:29:25 |
+----+-------------+---------+-------+------------+-----------------+--------------------+----------------------------+---------------------+
Model Versions:
+----+-------------+---------+------------+-------+------------+-------------+----------------------------------------------------+---------------------+
| id |    name     | version | model_type | score | score_type | description |                     created_by                     |       created       |
+====+=============+=========+============+=======+============+=============+====================================================+=====================+
| 5  | bookkeeping | v2      | lightgbm   | 0.869 | f1_score   | None        | app-celeryworker-delretrain-ration-service-account | 2023/12/05 12:20:38 |
+----+-------------+---------+------------+-------+------------+-------------+----------------------------------------------------+---------------------+
| 4  | bookkeeping | v1      | lightgbm   | 0.616 | f1_score   | None        | owen.saldanha@kortical.com                         | 2023/12/05 11:43:18 |
+----+-------------+---------+------------+-------+------------+-------------+----------------------------------------------------+---------------------+
A small test suite has been included in the tests folder, which also uses the deployed app to trigger a retrain. This will be run during Continuous Integration builds, if the Github repository has been set up correctly.
# Setting up the Github repository and CI/CD
TIP
Refer to the relevant section in the ML Ops - Deployment guide to set this up.
There are parallels between the deployment framework, app and model:
- The app serves as a framework for monitoring/improving the model.
- The Kortical project + Github CI/CD serves as a framework for monitoring/improving the app.
When the app is working as intended, you can promote to the UAT and Production environments. The app will expect to find a separate Bigquery dataset for each environment, so make sure you set this up (you can use the scripts in local/bigquery that were run earlier).
Why have separate datasets for each environment?
This prevents us from polluting a dataset with any activity that occurs in other environments. For example, if there is a data issue in production you can run the following script:
> python local/create_challenger.py <challenger-name> <from-environment-name>

## Make sure you use the correct arguments! E.g for prod debugging:
> python local/create_challenger.py production_owen production
This script will create an environment cloned from Production with the correct components; it will also clone the current state of the production Bigquery dataset, so the live environment is not further harmed by debugging or database manipulation in an effort to fix the issue.
The Github CI/CD also makes use of the challenger environment/database mechanism during PRs to avoid interference with other users working off the Integration environment.